


Your sixth client signs and someone spends an afternoon rebuilding the same statuses, fields and Automations for the sixth time. Then Monday arrives and you still can’t see which client work is late without opening six Spaces one by one. A few early setup choices create that cost, and it grows with every client you add.
Prefer to watch? The full walkthrough is on YouTube:
I’ve helped more than 200 businesses build and improve their ClickUp systems. The same five setup mistakes keep sending small service teams back to rebuild work they’ve already done: one Space per client, inviting the whole team before the structure is clear, setting statuses differently on every List, creating the same Custom Fields List by List, and automating before the workflow is stable. Here is what each one costs and what I change instead.
Mistake 1: Creating one Space per client in ClickUp
A Space per client feels organised at first. Each client gets its own area, with its own statuses and its own fields. The trouble starts with client two, because now there are two copies of the same setup to maintain. By client six, every change to how you deliver work has to be made six times, and checking what’s overdue means opening each client separately. That is how a late deliverable for one client goes unnoticed until they chase you for it.
The fix is to organise by the work, not by the client. Put all delivery work in one Space, give each client a Folder, and put a List inside that Folder for each project or retainer. If Spaces, Folders and Lists are still fuzzy, my ClickUp hierarchy guide explains what each level is for.
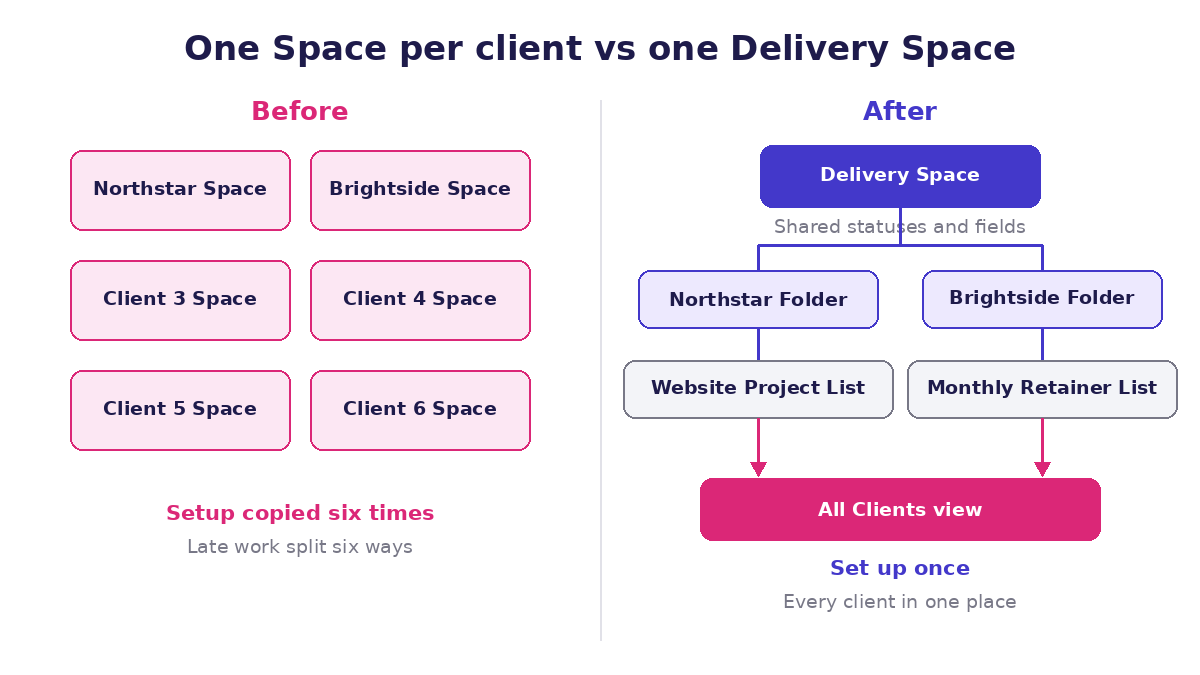
Here is how I build it, using two example clients: Northstar (project work) and Brightside (retainer work).
- Create a Delivery Space. Add a new Space and call it Delivery. This holds the delivery work for every client.
- Add a Folder for each client. Inside Delivery, create a Folder called Northstar and another called Brightside.
- Add a List for the work you deliver. In the Northstar Folder, create a List called Website Project. In the Brightside Folder, create a List called Monthly Retainer. Each List holds one project or retainer workflow.
- Move existing client work across, two tasks first. If you already have client Spaces, move one task from each of two client Spaces into the matching new List. Open each moved task and check its status, due date and Custom Field values came across as you expected. Move the rest once those two look right.
- Add one view across every client. On the Delivery Space, add a List view called All Clients. A Space-level view shows tasks from the client Folders and Lists inside it, so you can see the status and due date of every client’s work together, including what’s late.
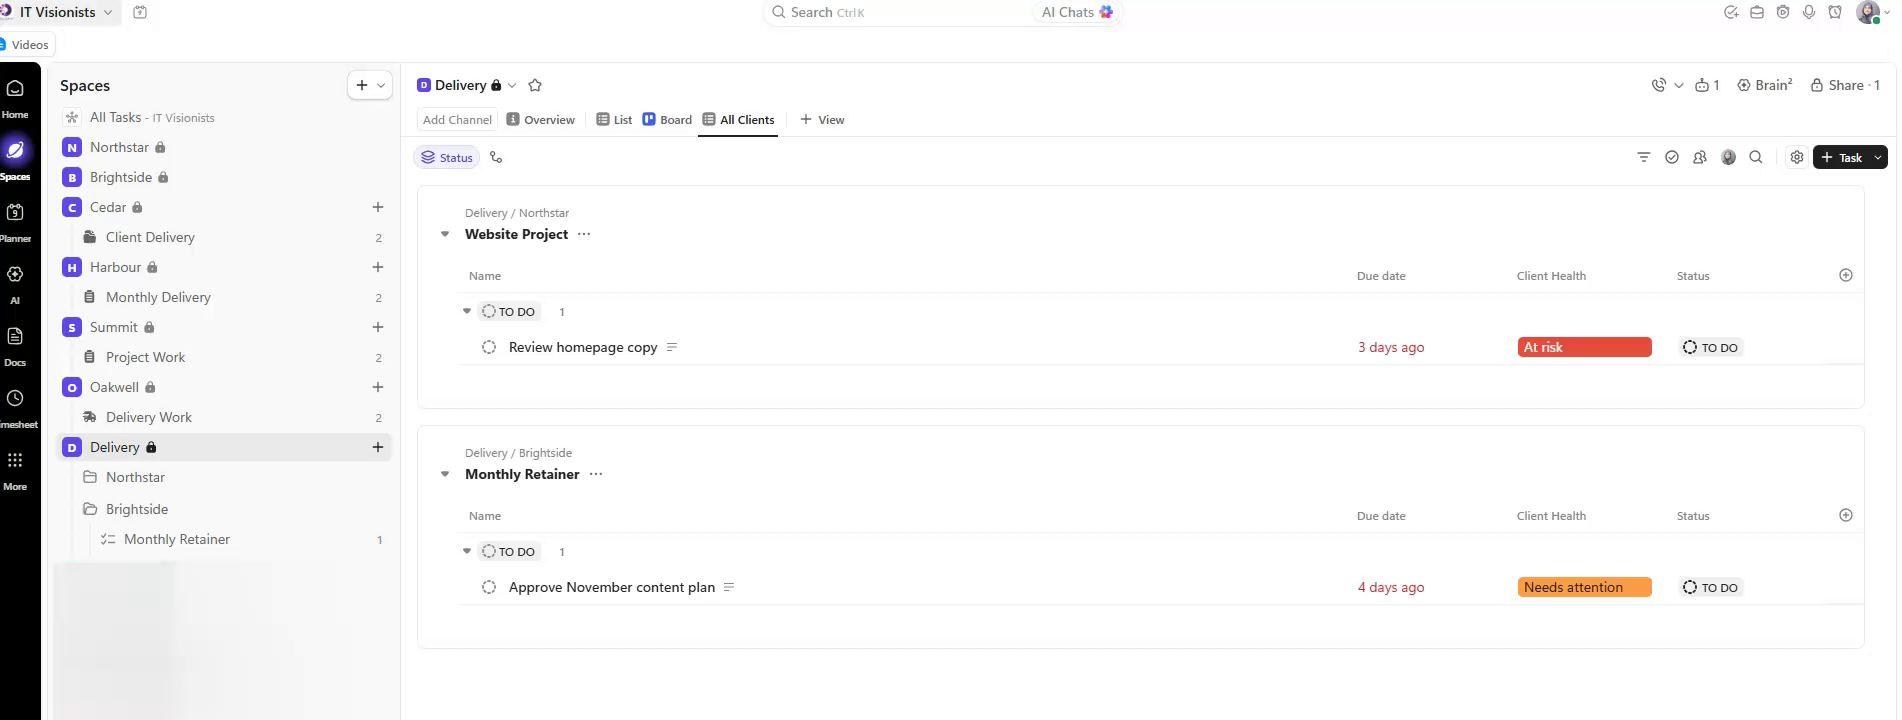
Project and retainer work can follow different workflows, which is why they get separate Lists inside the client’s Folder rather than separate Spaces.
Mistake 2: Inviting the whole team before the structure is clear
Inviting everyone early feels like progress. But if nobody has agreed where work belongs, each person builds their own Lists and habits. Six people can produce Website Project, Monthly Retainer, Client Delivery, Delivery Work, Monthly Delivery and Project Work: six names for the same kind of work. A few weeks later, someone is consolidating locations and retraining the team, and in the meantime tasks sit in Lists nobody checks.
Do it in this order instead:
- Map one shared workflow. Agree the stages client work moves through before you build anything.
- Build the client structure. Set up the Delivery Space, client Folders and Lists from Mistake 1.
- Test it with the people shaping the process. Ask two or three of them to add this week’s real tasks to the client Lists and move them through the statuses. Wherever they hesitate over where a task goes, fix the structure before anyone else joins.
- Invite the wider team. Bring people into a system they can follow, rather than one they have to guess at.
If you’re planning how to bring the team in, my guide to ClickUp training for teams covers how to make it stick.
Mistake 3: Setting different statuses on every ClickUp List
When each List gets its own statuses, the same stage ends up with different names. One List says Waiting. Another says Client Review. A third calls the same stage Approval. A report on work waiting for client sign-off has to know all three names, and if it misses one, it misses that client’s work. Soon nobody trusts the report. Every new List also has to be configured from scratch.
Set the workflow once, where every client List can use it:
- Open the Delivery Space settings. Go to the statuses for the Space.
- Set one common workflow. Use To do, In Progress, Review and Complete, or whatever stages you agreed in Mistake 2.
- Check each List inherits it. Open the status settings on Website Project and Monthly Retainer and confirm they use the Delivery statuses.
As of November 2026, Folders and Lists inherit their Space’s statuses by default, and you can override them on a Folder or List. Override only when the actual workflow is different, not because someone prefers another word for the same stage.
Mistake 4: Creating the same Custom Fields List by List
A Custom Field with the same name on two Lists is still two separate fields. If Northstar’s List has a Client Health field and Brightside’s List has its own Client Health field, a combined report can’t be trusted to treat them as one. You end up with a client health check that silently leaves clients out.
Create shared client fields high enough to be reused:
- Create the field at the Delivery Space. Add a Client Health Custom Field at the Delivery Space level, so every client List can use the same field.
- Show it where you look. Add Client Health as a column on Website Project, Monthly Retainer and the All Clients view.
- Keep project-only details lower down. A field that matters to one project belongs on that project’s List, not on the Space.
Mistake 5: Automating a ClickUp workflow before it’s stable
Copying an Automation into every client Space feels efficient until the process changes. Then every copy has to change with it, and a small workflow edit turns into a Workspace clean-up. Miss one copy and the reviewer for that client never gets assigned, which is how an unreviewed deliverable reaches a client.
Agree the hand-off first, then automate it once:
- Run the review hand-off by hand. Move tasks to Review and assign the reviewer manually until the team does it the same way each time.
- Confirm the review path. On the Delivery Space, check the workflow runs To do, In Progress, then Review.
- Create one Automation on the Delivery Space. Set it to assign the reviewer when a task’s status changes to Review. If Automations aren’t switched on for the Space yet, turn on the Automation ClickApp first. A rule at the Space level can apply to work in the client Lists below, so there is no separate copy to maintain for each account.
- Test it on a throwaway task. Create a test task in one client List, move it to Review and check the reviewer is assigned. Delete the test task afterwards.
The ClickUp setup order that prevents repeat work
Each of these mistakes is a step taken too early. The order that avoids them: map the work, build the Delivery Space, group clients into Folders with project or retainer Lists, set shared statuses and fields at the Space, invite the wider team, then automate the hand-off once it works by hand. For a fuller guide to setting up ClickUp for client work, read my ClickUp setup guide for service-based businesses.
Keep the All Clients view useful week to week
Open All Clients, sort by due date, and keep the Client Health column next to status. Build the first version around the questions you need to answer each week:
- What is late?
- Who owns it?
- Which client needs attention?
If a field or view doesn’t help answer one of those, leave it out. Every extra column is something the team has to keep up to date, and a field half the team ignores makes the whole view harder to trust.
Client six should mean another Folder, not another rebuild.
If you’re looking at a row of client Spaces and aren’t sure how to bring them together, book a free call and we’ll map your structure before the next client arrives.