If your ClickUp looks a bit of a mess, you are not alone. It is not your fault.
Most businesses think they have the right structure in place: Spaces, Folders, Lists, as they should be. The problem is that a wrong structure gives you a wrong foundation. Things get complex, hard to scale and eventually people stop trusting the system entirely.
There is also a more pressing reason to revisit your setup right now: ClickUp just released a brand new level to its hierarchy called Subfolders. If you set up your workspace more than a few months ago, your structure is probably already outdated, and this guide will show you exactly what to do about it.
Here I am going to cover every level of the ClickUp hierarchy including the new Subfolders, exactly when to use each one, how access works at each level, where your custom fields belong, and where your automations should live.
By the end, you will have a clear decision framework you can apply to your own workspace today. If you are a beginner and want to learn ClickUp, our detailed clickup tutorial for beginners will help you.
The One Principle That Runs Through Every Level
Before going level by level, here is the single principle worth keeping in mind throughout:
The higher up you set access, custom fields, and automations, the wider they apply. The further down you go, the more targeted they become. |
Every level of the hierarchy follows this same logic. Once that clicks, the rest becomes much easier to navigate.
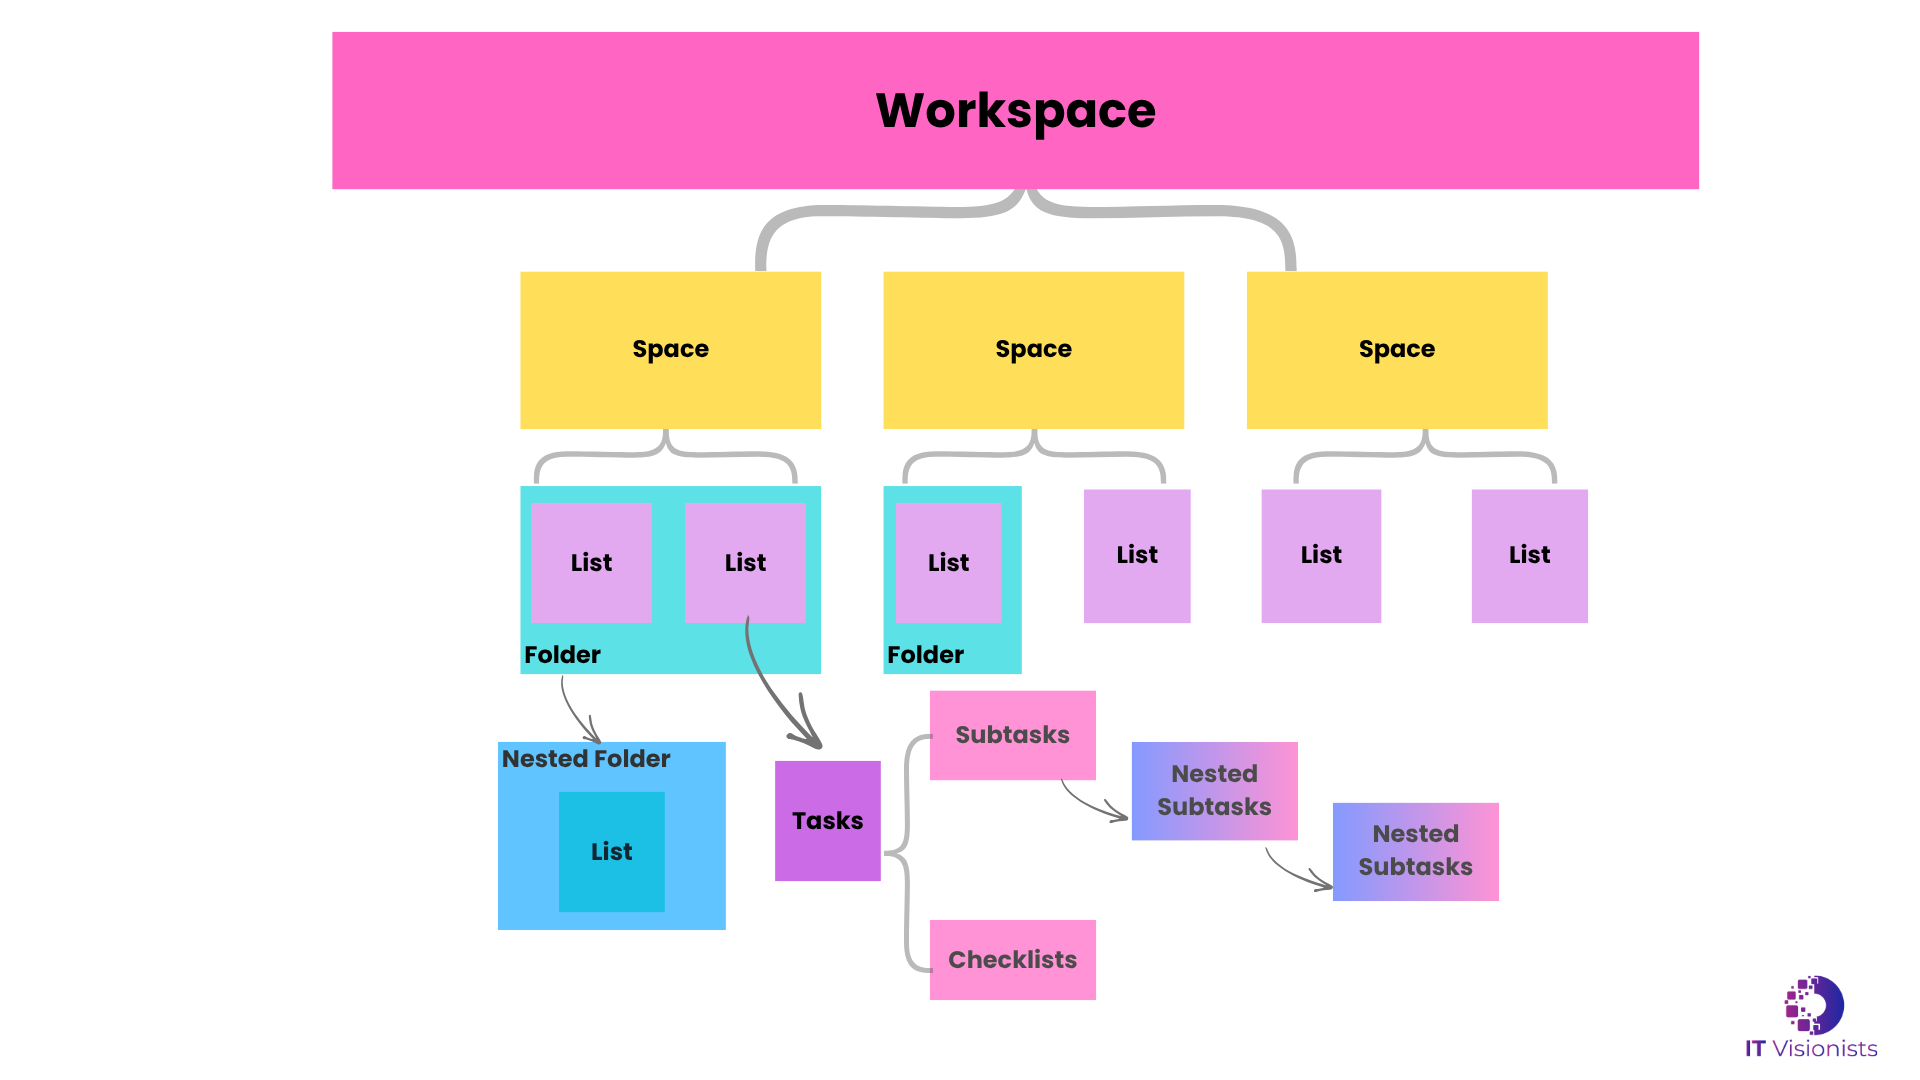
Level 1: Workspace
The Workspace is the top of everything. It is your company. Every Space, every Folder, and every task lives inside it.
The most important thing to know: you almost certainly only need one Workspace. It is a surprisingly common mistake to create multiple Workspaces thinking it helps separate things. It does the opposite. Separate Workspaces cannot share tasks, cannot share members easily and they break your reporting completely.
The only valid reason for multiple Workspaces is if you run two completely separate companies with no overlap, different brands, different billing, different teams, or if you are a ClickUp consultant managing workspaces for multiple clients.
Your Workspace is where you manage global settings, member permissions, billing, and integrations. It is the foundation. Do not overthink it.
Workspace | |
When to use | One per company. Where global settings, billing and integrations live. |
Access | Manage every member, guest and admin across your entire company here. |
Custom fields | Technically possible, but don’t. Fields set here bleed into every Space and become cluttered fast. |
Automations | Not available at Workspace level. Move one level down. |
Level 2: Spaces
Spaces are the first real organisational layer, and the one that sets the tone for everything below. Think of a Space as a department or a major area of your business.
Common Spaces include client delivery, internal operations, business development and your process library.
Each Space has its own statuses, custom fields, views, and members. When you create a Space, you are saying: work in this area operates differently from work in every other area.
The question to ask before creating a Space: does this area of work have meaningfully different statuses, workflows, or team members compared to the rest? If yes, it is a Space. If no, it probably belongs inside an existing one. |
A client project Space might have statuses like Onboarding, Active, In Review, Completed, and Paused. Your finance Space might have Draft, Pending Approval, Approved, and Paid. Completely different workflows deserve completely different Spaces.
Spaces | |
When to use | Use for a department or major area of business with its own statuses and team members. |
Access | First real control point. Make a Space private so only certain people know it exists (useful for finance or leadership). |
Custom fields | Fields set here apply to everything inside the Space. Use this for truly department-wide fields only. |
Level 3: Folders
Folders are the project or programme layer. In a client projects Space, each client might be a Folder. In an operations Space, you might have Folders for HR, processes and your tech stack.
Folders are optional. ClickUp lets you put Lists directly into a Space without a Folder, which works well for simple setups. But as soon as you are managing multiple clients, multiple projects, or multiple teams, Folders become essential for keeping things properly grouped.
Folders can have their own statuses that override the Space default. If an HR Folder within Operations has a different workflow than a Tech Stack Folder, it should have its own statuses rather than inheriting them from the Space above.
The question to ask: does this group of work have its own project identity, a name, a client, a campaign that needs to stay together? That is a Folder. |
Folders | |
When to use | Use for a major project, client, or programme that groups multiple related Lists. |
Access | You can restrict a Folder to specific people even if the Space above it is open to the whole team. |
Custom fields | Any field added at Folder level applies to every List inside it. Use this for fields specific to the project but not the whole department. |
Automations | Folder automations apply to everything inside. Useful for project-wide rules without going as broad as Space-level. |
Level 4: Subfolders (New In 2026)
Subfolders are the newest addition to the ClickUp hierarchy as part of ClickUp 4.0 (Learn more about What’s New in ClickUp 4.0), and they solve a problem that has frustrated teams for years.
A Subfolder sits inside a Folder and groups Lists together within a project. Here is a straightforward way to think about it: imagine you have a Folder for a large client. Inside that Folder, you are managing three distinct work streams, their website, their CRM setup, and their onboarding process. Each of those is substantial enough to need its own group of Lists. That is a Subfolder.
Before Subfolders existed, you had two options: flatten everything into one Folder and deal with a messy sidebar, or create separate Folders per work stream and lose the client grouping entirely. Subfolders solve that problem cleanly.
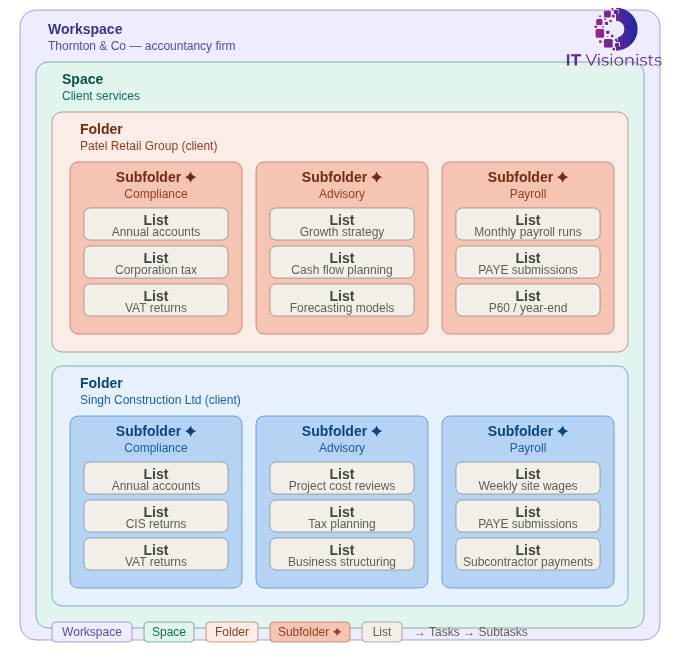
Subfolders have their own statuses, automations and permissions, just like a Folder. The one limit: you cannot create a Subfolder inside another Subfolder. The nesting is one level deep only. |
As Subfolders have their own permissions, you can assign a specific work stream to a different team without touching the rest of the client Folder. Custom fields set at Subfolder level apply to every List inside it, so if one work stream needs fields the others do not, set them here rather than pushing them up to the Folder level.
The question to ask before using a Subfolder: do I have multiple distinct work streams inside one project, each with their own Lists that need to be grouped? If yes, use a Subfolder. If your project only has a handful of Lists with no clear subgrouping, skip it. |
A note worth saying plainly: do not add hierarchy just because you can. Every level you add is a level someone has to navigate. More hierarchy is not better hierarchy. The right hierarchy is.
Subfolders | |
When to use | Use when a Folder contains multiple distinct work streams, each needing their own group of Lists. |
Access | Own permissions. You can assign a different team to a Subfolder without touching the parent Folder. |
Custom fields | Fields at Subfolder level apply only to Lists inside that work stream. Keeps things clean. |
Automations | Own automations per work stream. Useful for cross-List rules within that work stream only. |
Level 5: Lists
Lists are where the actual work lives. A List is a workflow, a collection of tasks that move through the same set of statuses. Every task must live in a List.
Good examples of Lists: Active Client Tasks, Blog Posts, Leads Pipeline, Q2 Campaigns. Each of these is a workflow with a defined set of stages.
Lists have their own statuses, views including Board, Calendar, Gantt, and Table, and their own automations. Custom fields set at List level apply only to tasks in that specific workflow, with no bleed into anything else. If your leads pipeline needs a Deal Value field that your blog post List does not, set it at the List level.
The question to ask: do the tasks here move through the same stages together? That is a List. If you are constantly filtering to separate two types of work inside one List, you need two Lists. |
One note worth emphasising: do not create too many Lists. It is easy to end up with 40 Lists where eight would do the same job better. More Lists means more navigation, more context-switching, and more confusion.
Lists | |
When to use | Use for a workflow, a collection of tasks that move through the same stages. |
Access | Lists can be made private if the workflow should only be visible to certain people. |
Custom fields | Fields at List level apply only to tasks in that workflow. Most specific and targeted level for fields. |
Automations | Your most targeted automation rules. Fire only within this one workflow. Example: when status moves to In Review, notify the reviewer. |
Level 6: Tasks
Tasks are the unit of work. Each task represents one deliverable, one action, one thing that needs to get done.
A good task name describes the outcome, not the activity. Inside a task you have custom fields defined at the List, Folder, or Space level, along with assignees, due dates, descriptions, attachments, comments, and time tracking. The task is where your team fills those fields in.
Individual tasks can be made private and visible only to the assignee and watchers, which is useful for sensitive action items where you do not want to restrict the whole List. Automations are not set at the task level, but everything you set above gets triggered by what happens here: a status change, a due date arriving, or an assignee being added.
ClickUp’s Custom Task Types are also a powerful way to categorise work with clear labels and icons and to run automations or views that adapt to your processes.
Level 7: Subtasks And Checklists
Subtasks are tasks within a task. Use them when a task has multiple distinct steps that need to be tracked individually, especially when different people own different steps.
Subtasks are powerful but easy to overuse. If a subtask is becoming substantial enough that it might need its own subtasks, or if it would be clearer as a separate task in a List, pull it up. Subtasks should be simple action items, not mini-projects.
Checklists inside tasks are for simple to-do items that do not need individual tracking or due dates. The rule is simple: if it needs a checkbox, use a checklist. If it needs tracking, use a subtask.
The Decision Framework: What Level Should This Be?
Here is the framework to apply whenever you are unsure where something belongs. Work through the questions in order.
Question | Yes | No |
Is this a completely separate area of business with its own team and workflow? | Yes → It’s a Space. | No → Keep going. |
Is this a major project grouping multiple related workflows together? | Yes → It’s a Folder. | No → Keep going. |
Does this project have distinct work streams, each containing multiple Lists? | Yes → It’s a Subfolder. | No → Skip Subfolders entirely. |
Is this a workflow — a collection of tasks moving through the same stages? | Yes → It’s a List. | No → Keep going. |
Is this a unit of deliverable work? | Yes → It’s a Task. | No → Keep going. |
Does this task have multiple distinct steps owned by different people? | Yes → Use Subtasks. | No → Use a Checklist. |
There’s no single right answer for every business. A three-person consultancy and a 50-person SaaS company will structure their ClickUp differently. And that’s correct. The framework gives you the logic. Your business context gives you the specifics. |
At IT Visionists, we offer tailored solutions to simplify operations and boost performance. Contact us today to take the next step toward smarter business growth!