While project management can seem like a difficult task, it can become easy with the right tools. One such tool that can improve your efficiency and organization in project management is ClickUp. In this beginner’s guide, we will explore how project managers can harness the power of ClickUp to plan, track, and collaborate effectively.
The Power of ClickUp
ClickUp is an adaptable project management tool with features that can be adjusted to meet the specific requirements of your project. Say goodbye to one-size-fits-all solutions and embrace a platform that understands the specific challenges faced by project managers in different sectors.
If you’re looking for expert assistance in setting up and optimizing your ClickUp workspace, you may want to hire a ClickUp specialist to streamline your workflow and maximize efficiency.
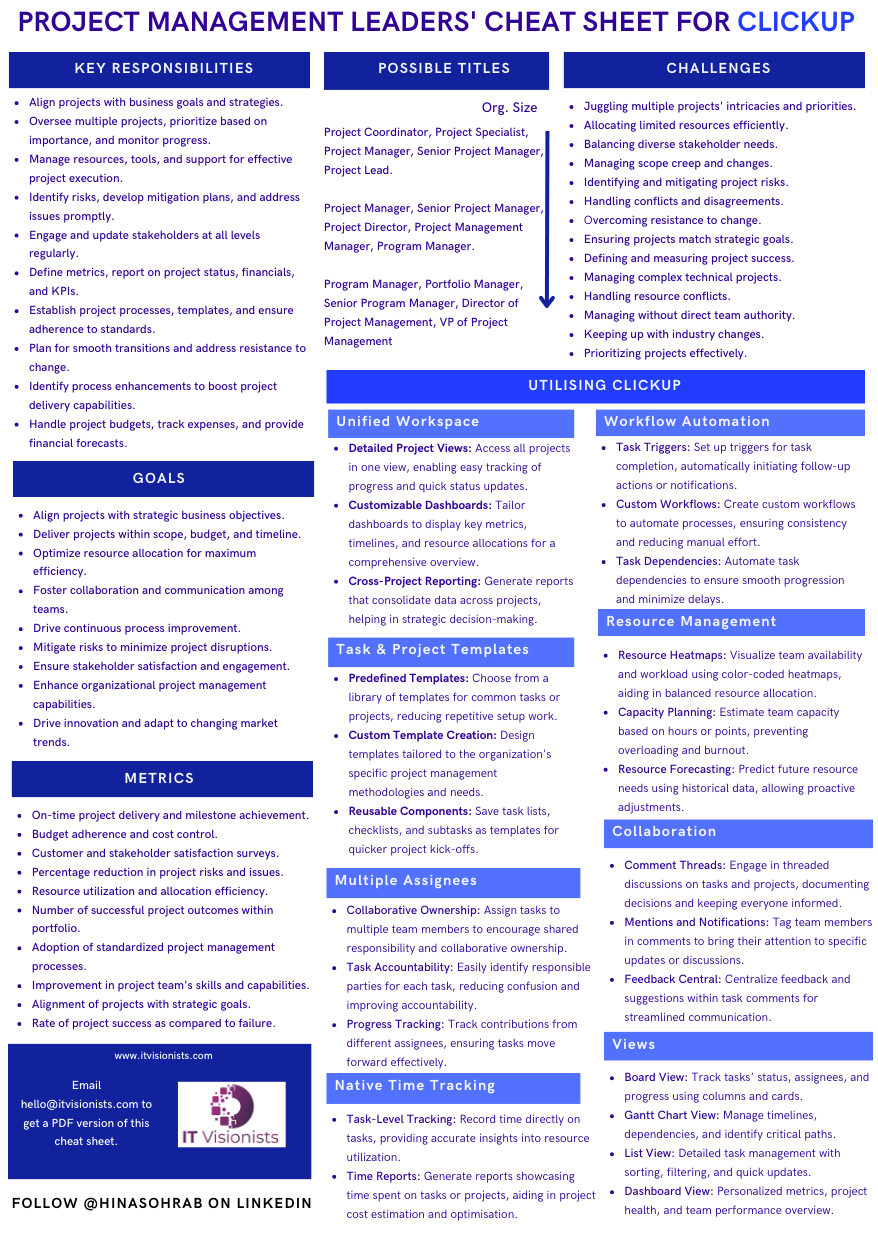
Here is ClickUp’s cheat sheet for Project Managers:
Understanding ClickUps Hierarchy
From Chaos to Order: A Fortress of Organization
Imagine managing multiple businesses or complex projects with ease. ClickUp’s hierarchy system helps you do just that. It consists of several layers:
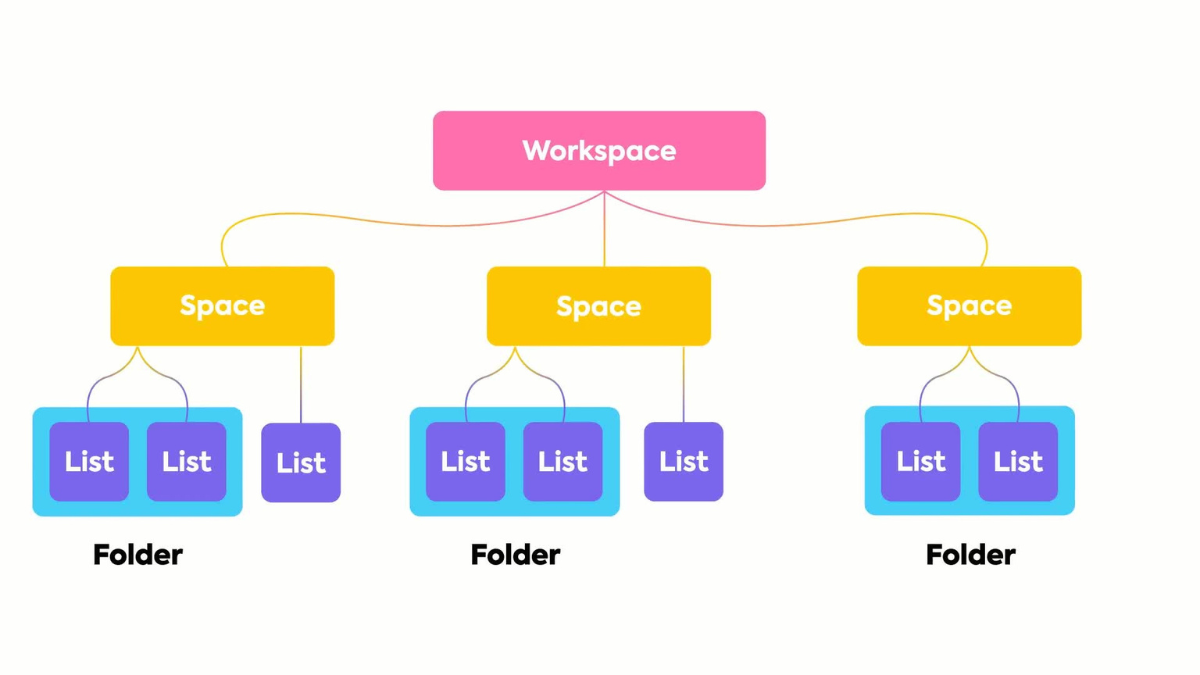
Workspace
The Workspace, which serves as a container for your whole company or project, is at the top of the hierarchy. Consider it as the hub of organization for all of your activities.
Spaces
In the Workspace, you create Spaces, each a unique territory dedicated to a specific department. This ensures every team has its own clear and organized area, fostering productivity and focus.
Folders
Deeper within Spaces, you’ll discover Folders, which house Lists. Think of these Folders as chapters in your project’s story, each one meticulously organizing tasks and information. This structure ensures that every detail is in its place, making it easier to track progress and stay on top of your project.
Lists
Lists are a collection of tasks that narrate the story of your project. Each List amazingly organizes the tasks that bring your project to life, providing a clear path to success.
Tasks
Tasks are the building blocks of your project, each one representing a critical piece of work. These tasks are like stars shining within their Lists, driving progress and purpose. By completing each task, you illuminate the way forward, ensuring your project moves steadily towards its goals.
Subtasks and Checklists
Subtasks break down missions into smaller conquests, ensuring no detail goes unnoticed. Checklists act as trusty maps, guiding you through each task with precision.
ClickUp’s hierarchy empowers you to lead your team to new heights of efficiency and organization. Each level holds a unique key to reduce confusion and enhance productivity, creating a seamless workflow that drives your project to an up level. With this structure, every team member knows their role, and every task is clearly defined, paving the way for success.

Unlocking Workflow Magic
Implementing a project management tool like ClickUp requires a strategic approach. Workflow mapping is the secret to success.
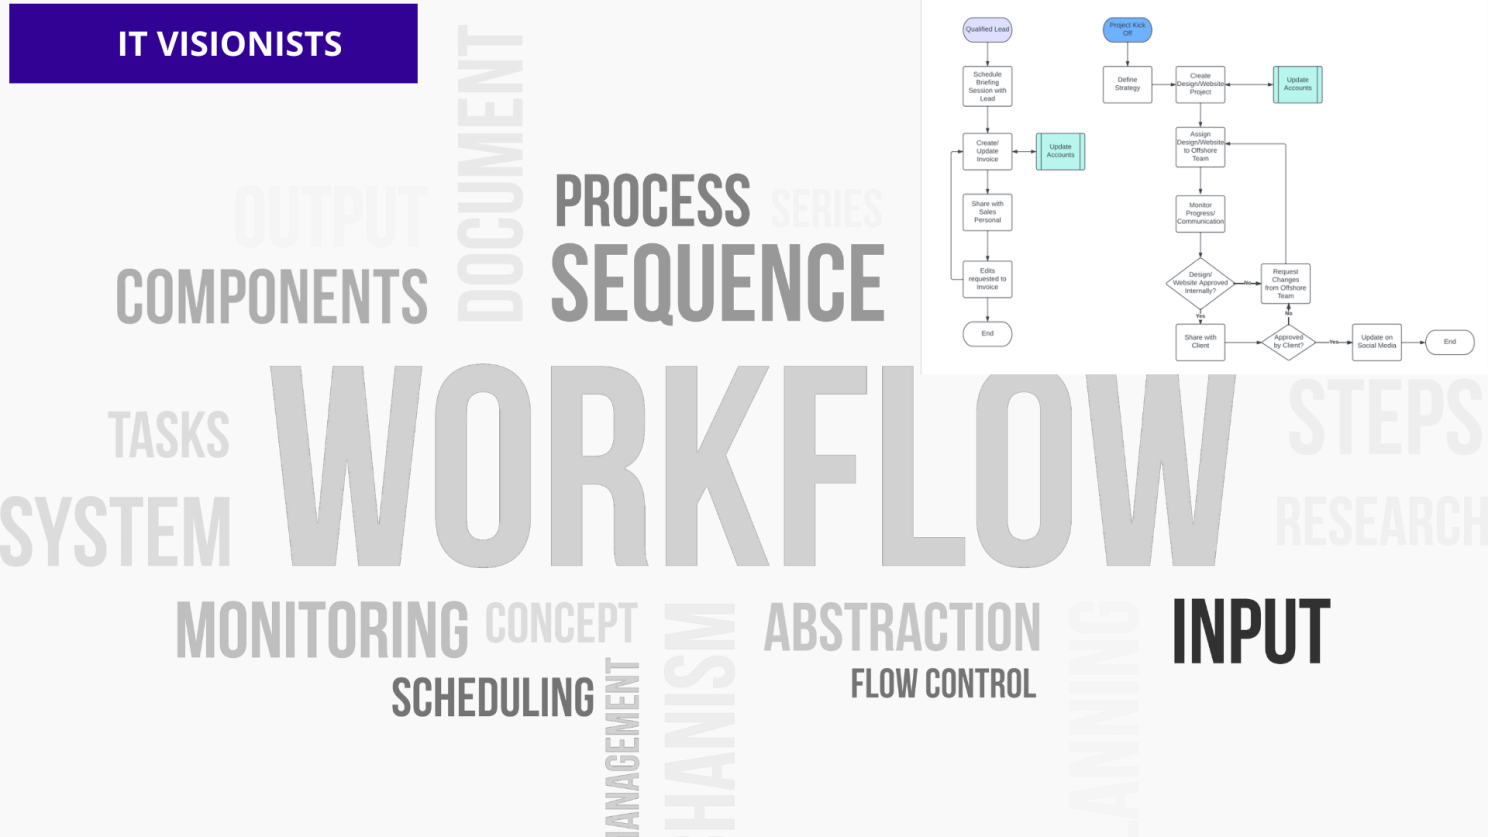
Consider this example:
Marketing Department Workflow:
- Initiation: New campaign ideas and briefs.
- Planning: Strategy, content planning & scheduling.
- Execution: Content creation, design & campaign launch.
- Monitoring: Tracking campaign performance, data analysis.
Closure: Review, lessons learned & final reporting.
Engineering Department Workflow:
- Requirement Gathering: Project scope, user stories & features.
- Design & Development: Architecture, coding & testing.
- Quality Assurance: Testing, bug fixing & validation.
- Deployment: Launching the product & monitoring stability.
- Feedback & Improvement: Gathering user feedback, and iterations.
Workflow mapping ensures that each step seamlessly transitions into the next, promoting balance and cohesion. It’s about comprehending not just what needs to be done, but also why and how each action fits into the larger picture.
With well-defined workflows in place, you’re not just utilising tools; you’re enhancing efficiency. Your team understands where to begin and the necessary steps to follow, setting the stage for a smooth and productive journey.
Setting Up a Project Management Space in ClickUp
Creating a project in ClickUp can be done in two ways: using a template or starting from scratch. Here are step-by-step instructions for both methods to create a space-level project:
Option I: Setting Up a Project from Template
- Log in & choose Workspace.
- Tap “+ New Space” on the left.
- Select “Templates.”
- Browse or search for your template.
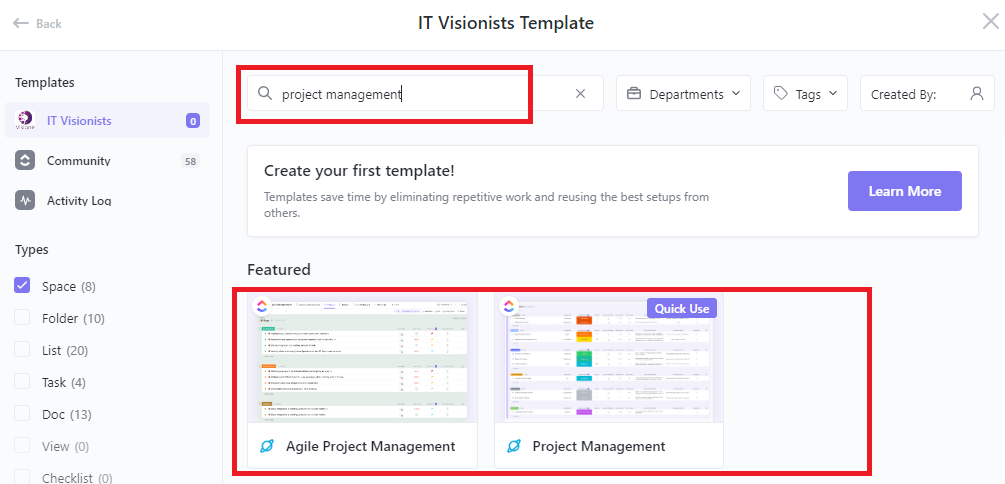
- Preview it to ensure it fits.
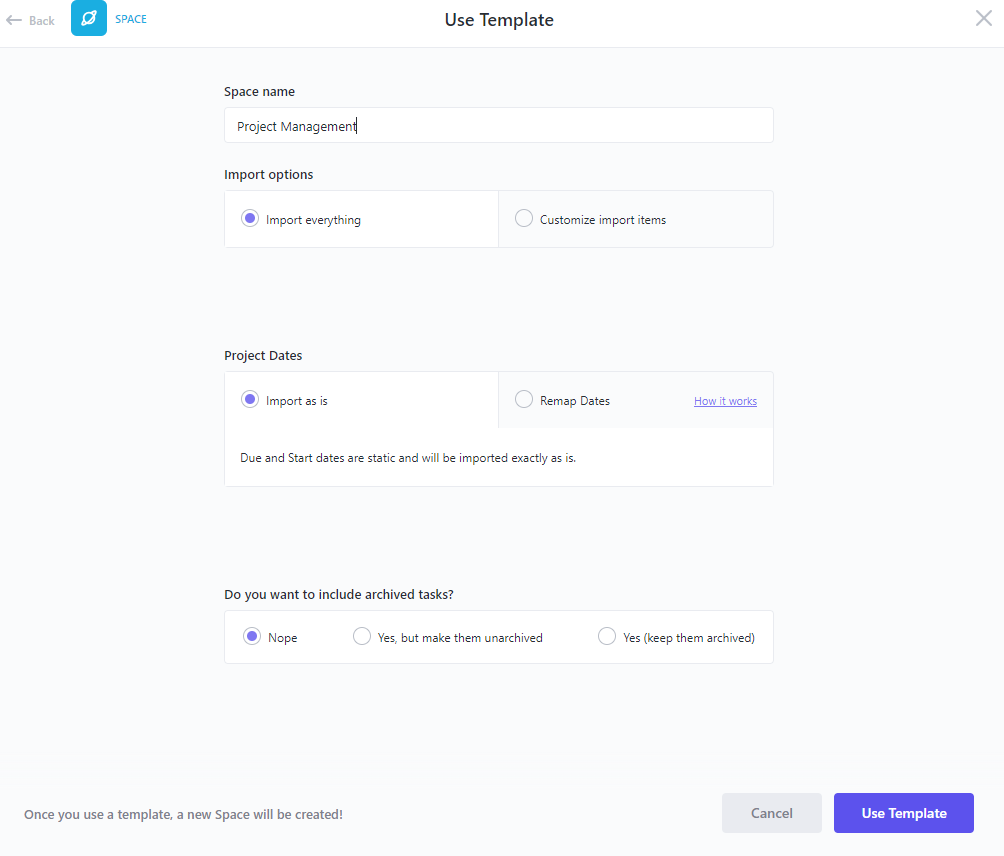
- If it’s suitable, click “Use Template.”
- Personalize the name and details.
- Press “Use Template” to create it.
Option II: Setting Up a Project from Scratch
- Log in & choose Workspace.
- Click “+ New Space” on the left.
- Provide the Project Name under Space Name.
- Click Next.
- Choose Space Color & Avatar.
- Decide whether to share it with workspace members or keep it private.
- Choose or set up the Task Statuses you need, like To Do, In Progress, Review, QA, Complete.
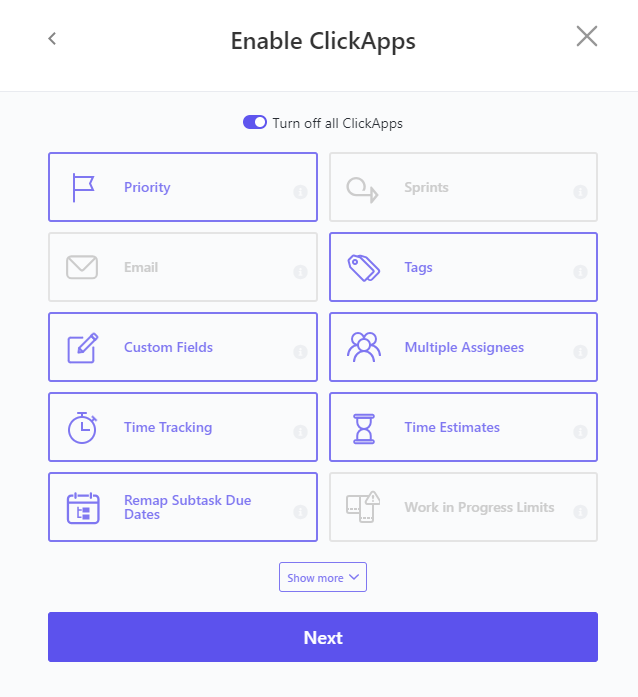
- Enable ClickApps you require, such as Priority, Custom Fields, and Time Tracking.
- Choose the Views you’ll need.
- Review the Space.
- Once everything is in order, confirm “Create Space.”
Setting Up Custom Fields
- Create Custom Fields: Click on the three dots (…) next to your project name, go to More Settings, and then click Custom Fields. Here, create fields tailored to your project’s needs, such as “Priority,” “Status,” or “Due Date.”
- Choose Field Types: Different field types are available, such as dropdowns, checkboxes, dates, numbers, etc. Select the appropriate type for each custom field based on the data you want to collect.
Setting Up Tasks
- Create a List for tasks.
- Manually add tasks to the List, either one by one or by applying templates.
- Task templates bring details, checklists, and attachments.
- Set Dependencies using Relationships where applicable.
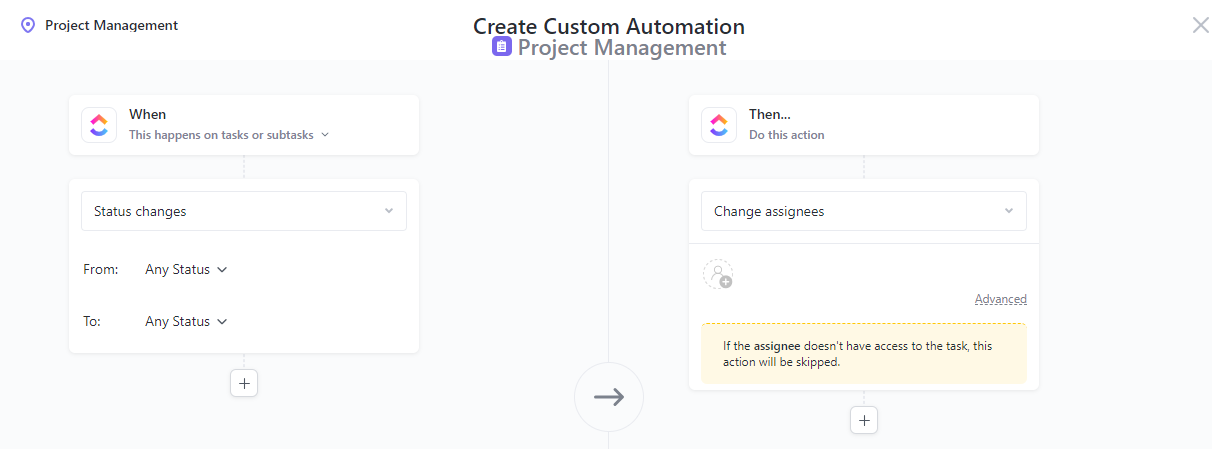
Setting Up Automation
- Head to the Automation Manager.
- Set triggers, conditions, and actions.
- Automate assignments, reminders, and more!
Setting Up Views
Consider adding new views that fit your role as a project manager:
- Board view: Observe work on a Kanban-style board and move tasks between statuses or groupings.
- Gantt view: Visualize work within a time period, view or set dependencies across a project.
- Calendar view: See work in a calendar format to track due dates throughout each month.
With these steps, you’re all set to start tracking and managing your project efficiently.
Gain Better Project Visibility with ClickUp Custom Fields
Custom Fields in ClickUp are a powerful tool for tracking and managing your project effectively. Here’s how to make the most of them:
- Create Custom Fields: Under More Settings of your project, select the “Custom Fields” tab. Tailor these custom fields to your project’s needs, such as “Priority,” “Status,” or “Due Date.” You can set custom fields at the Space, folder, or list level.
- Choose Field Types: ClickUp offers various field types like dropdowns, checkboxes, dates, and more. Select the perfect field type for each custom field to capture essential data accurately.
- Assign to Tasks: Once set, you’re ready to use these custom fields in tasks. Open a task and pick custom field values from the provided options to enrich task details.
- Filter and Sort: Harness custom fields to filter and sort tasks effortlessly. Focus on what matters by sorting tasks by priority, status, or due date.
- Track Progress, Generate Insights: Use custom fields to track project progress effortlessly. Update task statuses, mark completions, or monitor key metrics. Create insightful reports using custom field data for valuable project performance insights.
- Automate Workflows: Set up rules to automate actions based on custom field values. Automatically assign tasks or trigger notifications when custom field conditions are met. Always check what is already created to avoid ending up with similar custom fields in your workspace.
Automating Your Workflow
Automating tasks can save you hours of work and increase your productivity. Here’s how to set up automations in ClickUp in three simple steps:
- Set Your Triggers: Determine the events or conditions that will trigger an automation.
- Know and Apply Conditions: Define the conditions that must be met for the automation to run.
- Set Actions to Be Taken: Specify the actions that should happen when the automation is triggered.
With these steps, you can automate repetitive tasks and streamline your workflow, allowing you to focus on more strategic aspects of your project.
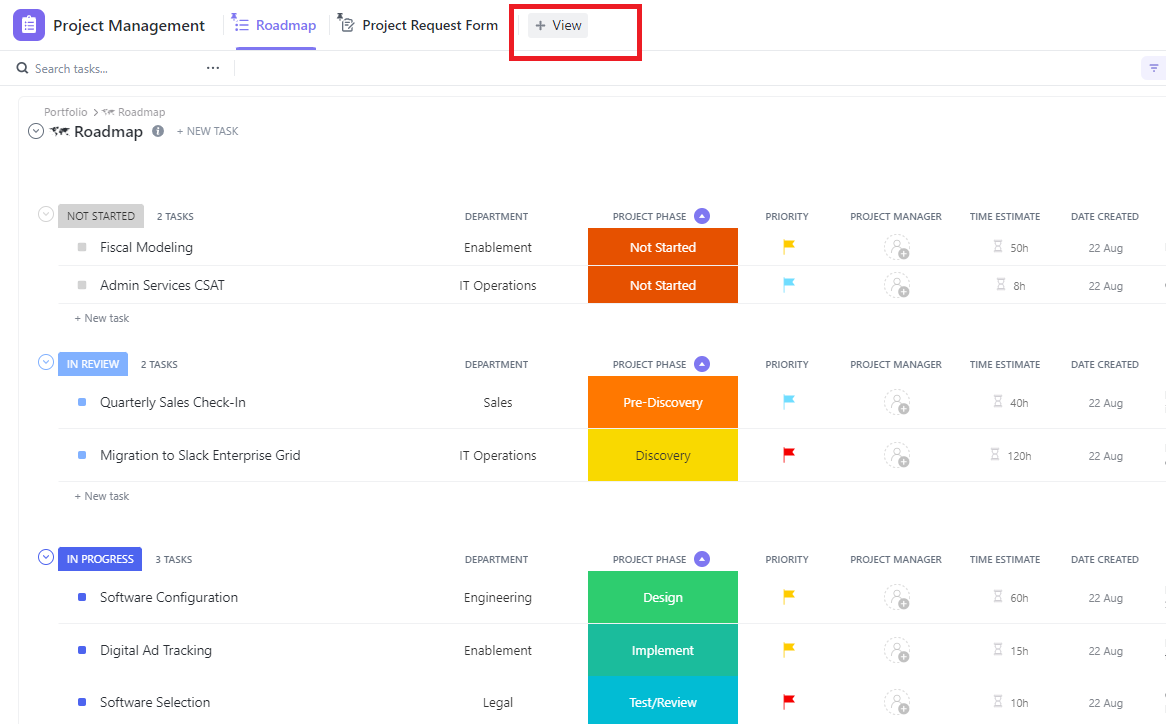
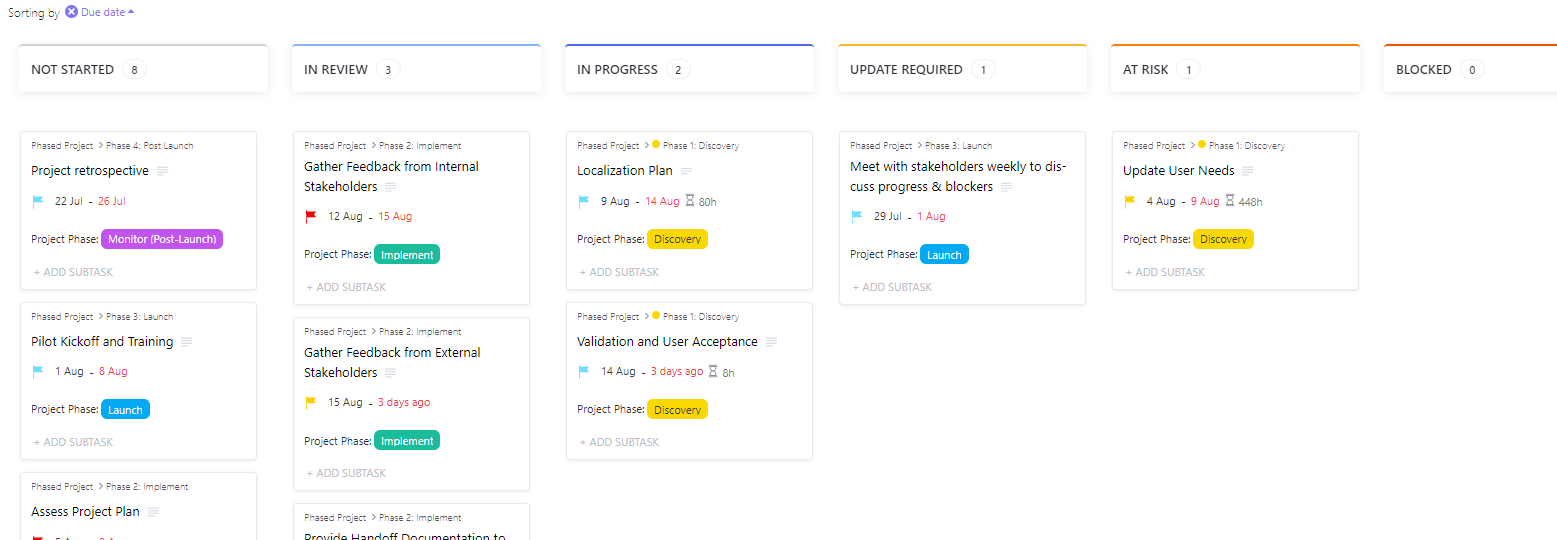
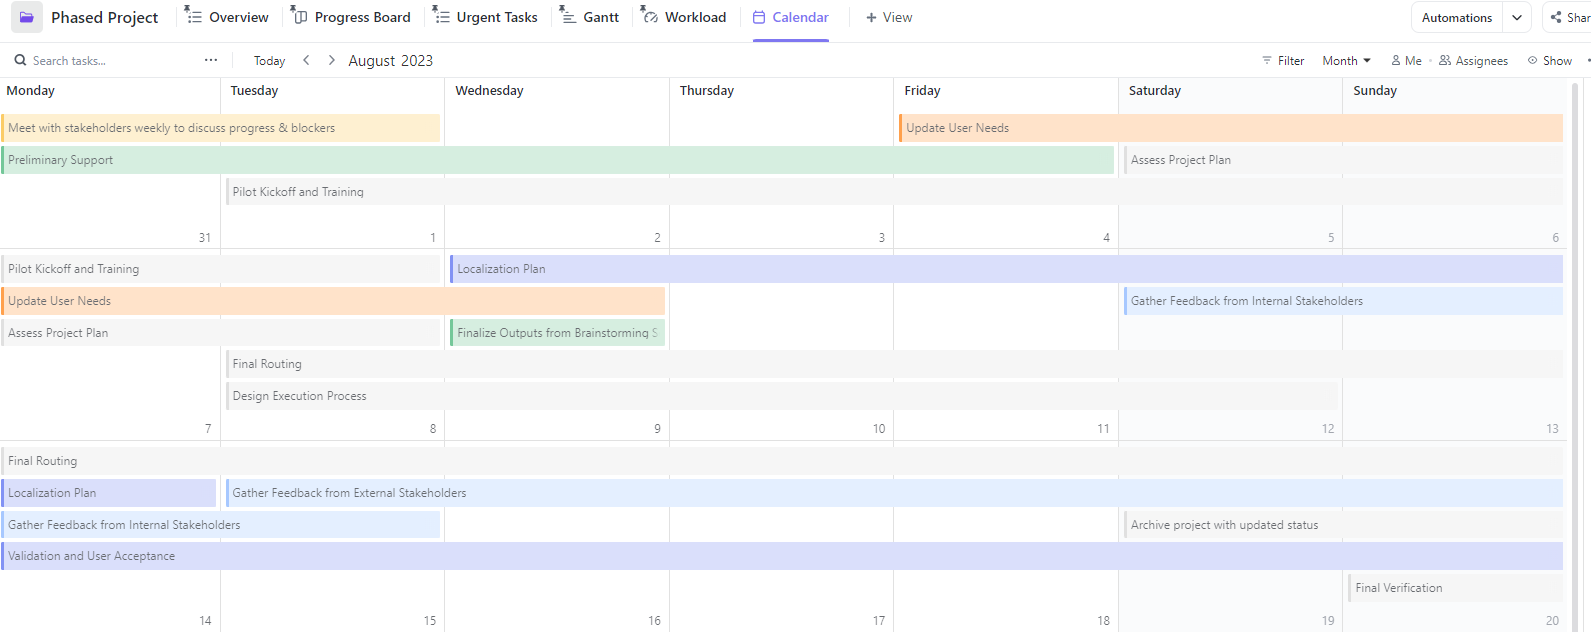
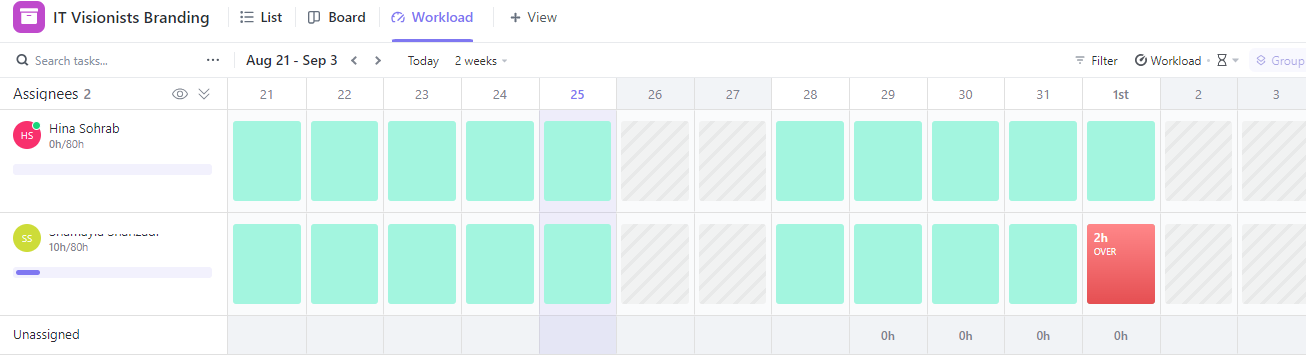
Using ClickUp Views for Better Project Management
ClickUp offers various views to help you manage your projects more effectively. Here are four views that can take you from micro-managing to macro-insights:
Board View:
View tasks on a Kanban-style board and move them quickly between statuses or groupings with ease.
Calendar View:
See work in a calendar format to view due dates for each month.
Resource Allocation View:
Gain a visual representation of team capacity, allowing you to allocate tasks based on workload and availability.
Gantt Chart View:
Visualize project tasks, dependencies, and milestones on a timeline, aiding in rescheduling and workload management.
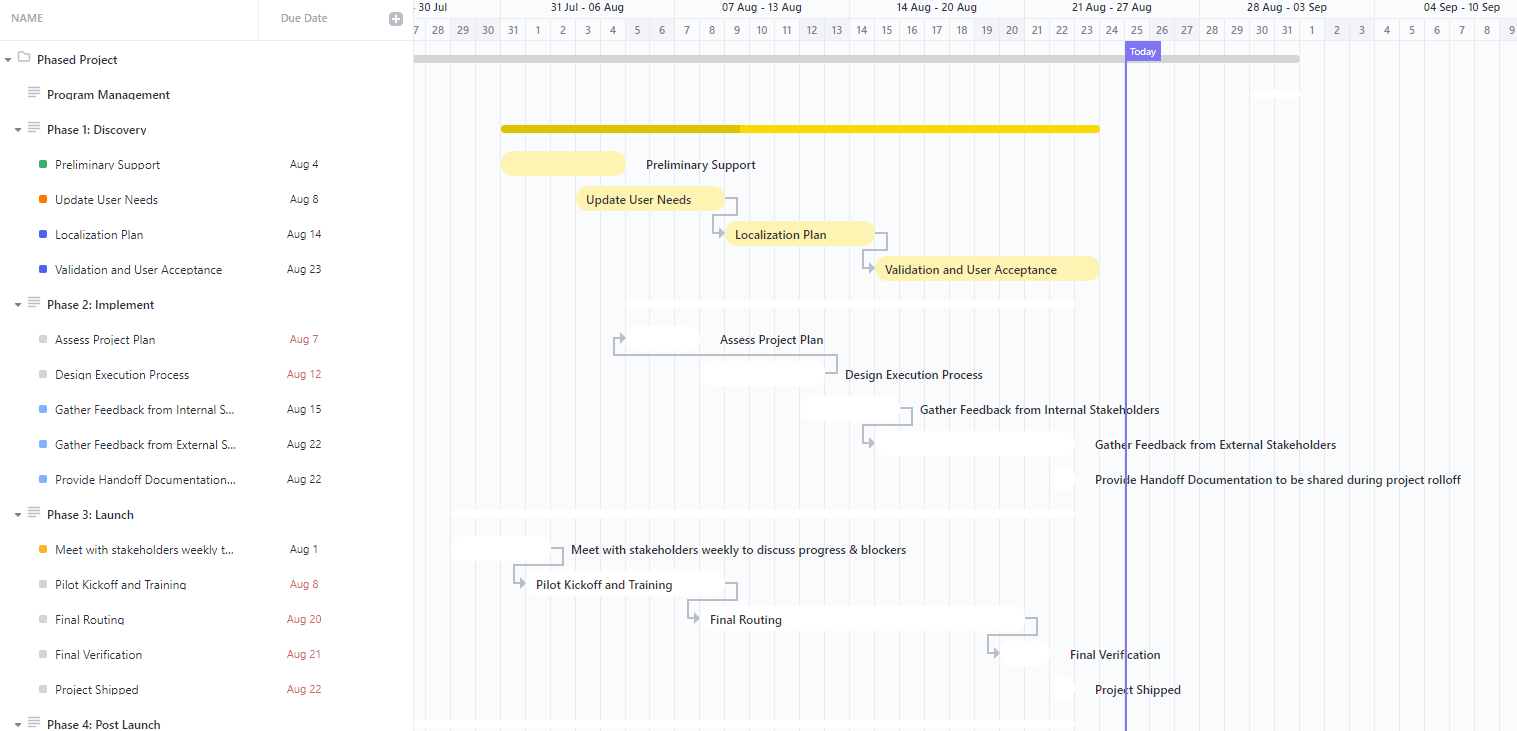
These views provide valuable insights and help you stay on top of your project’s progress and resource allocation.
Setting Permissions for Collaboration
Collaboration is essential in project management, but it’s equally important to control access to project data.
In ClickUp, you can set permissions for various items like Folders, Lists, tasks, views, Docs, Dashboards, and Goals. These permissions apply to both guests and members and come in four levels:
- View Only: Grant read-only access.
- Comment: Allow adding and replying to comments.
- Edit: Enable making changes and sharing (no deletion).
- Full: Provide complete control, including creation, editing, and sharing.
Permissions can vary depending on the item type and user role. Spaces can be private, accessed only by specific individuals and teams, while guests can’t access Spaces but can access shared Folders, Lists, and Tasks. Admins, owners, and members with edit permissions can share read-only versions of tasks, Docs, or views with anyone, even those outside ClickUp.
Custom permissions for different user roles are available in higher-tier plans like Business Plus or Enterprise Plan, allowing you to fine-tune permissions for guests, members, admins, and custom roles. Properly managing access ensures you’re sharing the right content with the right people.
Leveraging ClickUp Dashboards
Dashboards in ClickUp are a powerful tool for visualizing, analyzing, and tracking your work in real-time. They offer a bird’s-eye view of your projects, help identify bottlenecks, and track progress towards your goals.
Here’s how to create and utilize ClickUp Dashboards:
1-Go to the Dashboards tab.
2-Click the + icon next to My Private Dashboards.
3-Select a pre-made template or create a custom Dashboard.
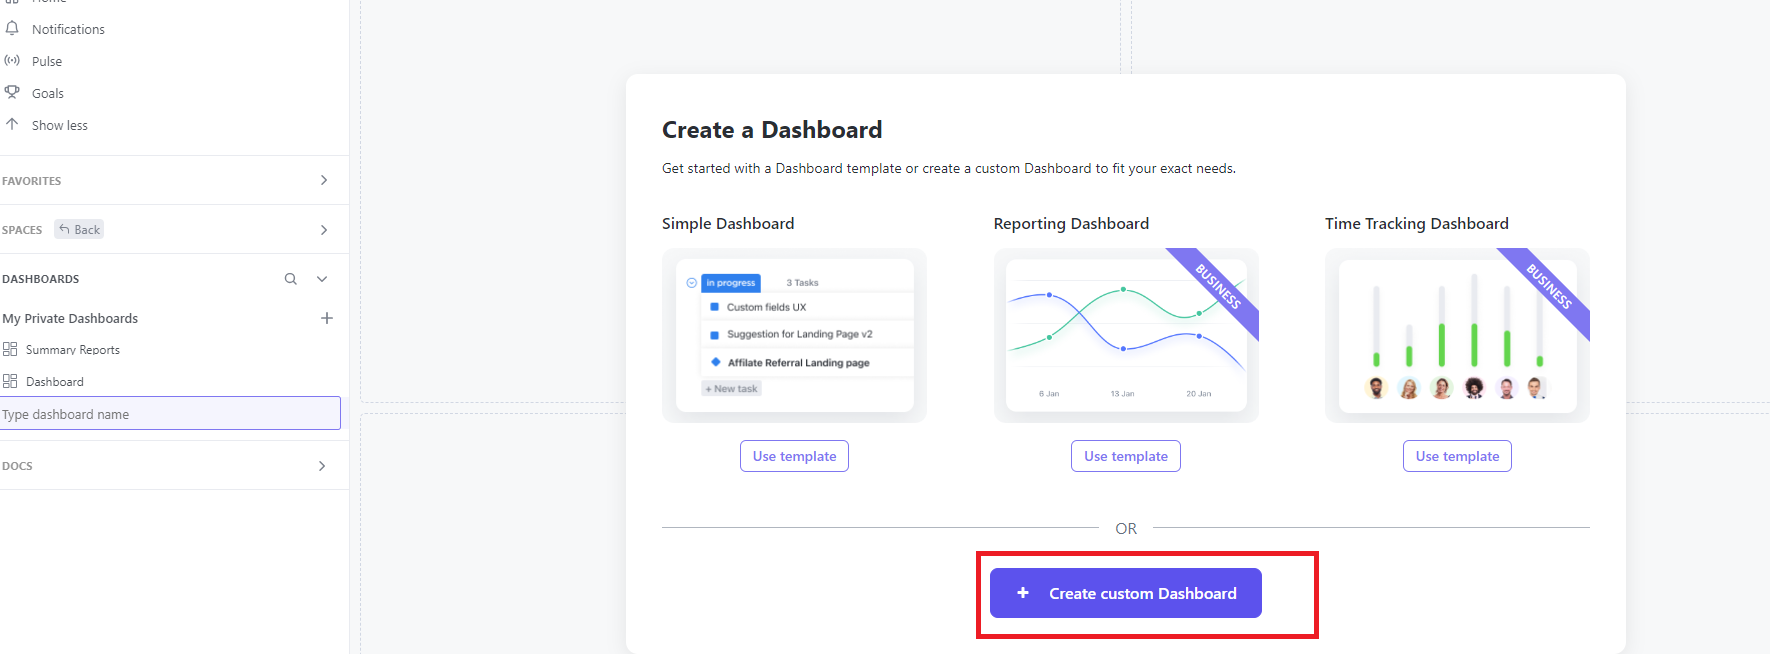
4-Choose a location for your Dashboard.
5-Add relevant widgets to your Dashboard.
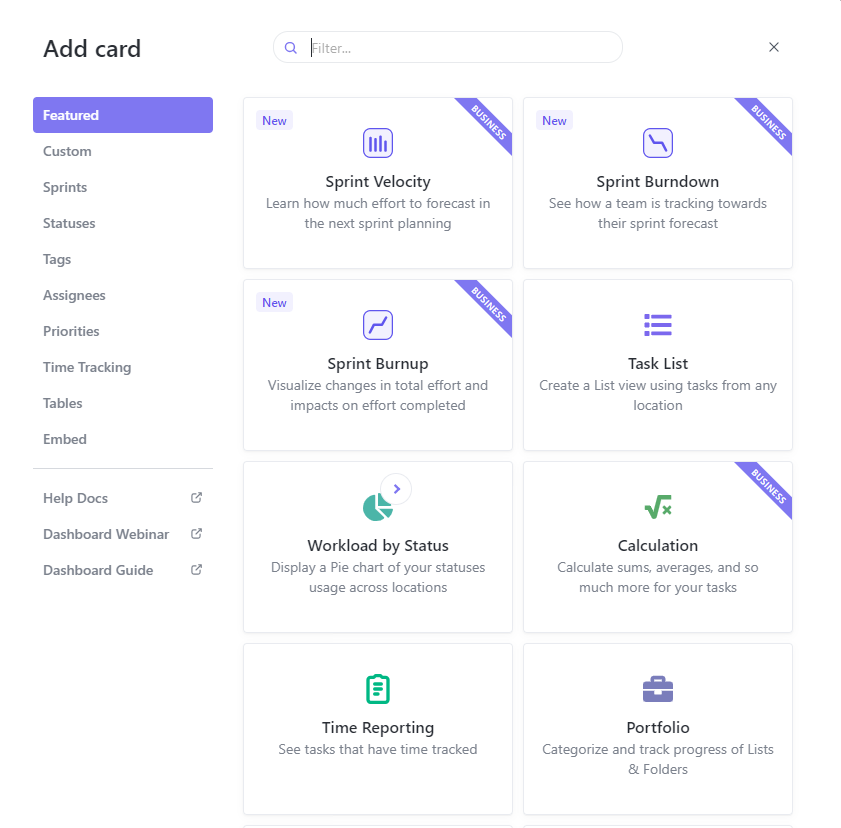
Widgets available to you will vary based on your ClickUp plan but may include charts, text blocks, timelines, Kanban boards, and more. Design your Dashboard with clear titles, consistent visual elements, and only vital data to maintain clarity. Regularly update your Dashboards to reflect the latest changes in your projects and experiment with different widgets and layouts to find what works best for you.
Simplifying Notifications in ClickUp
ClickUp notifications are a vital part of project management, but they can become overwhelming.

To regain control and maintain focus, follow these steps:
- Customize Your Notification Settings: ClickUp allows you to tailor your notification settings to your needs. Choose specific events to be notified about and select your preferred notification channels, such as email, mobile, or desktop.
- Use the Right Notification Channels: Not all notification channels are equally important. Disable notifications for less critical channels to focus on what matters most.
- Tailor Notifications to Your Role: Customize your notification settings based on your role. What’s important for a team member may differ from what a manager needs to know.
- Use Filters: ClickUp lets you filter notifications, making it easier to focus on specific projects or tasks. For example, create filters for tasks due today.
By following these steps and utilizing features like the Daily Summary and task reminders, you can ensure that ClickUp notifications work for you, not against you. Remember to regularly review and adjust your notification settings to stay efficient and up-to-date.
In conclusion, ClickUp is a versatile and powerful project management tool that can transform the way you work. By understanding its hierarchy, setting up your space, leveraging custom fields, automating workflows, using views effectively, managing permissions, utilizing dashboards, and simplifying notifications, you can become a ClickUp pro and supercharge your project management skills. Say goodbye to chaos and hello to organized, efficient, and successful project management with ClickUp.