


A new client signs, the team is ready to start and the first week turns into a search through emails and messages for the contract, invoice, access details and kickoff actions. That confusion costs time and can make a client question the service before delivery has even begun.
Prefer to watch? The full walkthrough is on YouTube: https://www.youtube.com/watch?v=UZG9GbMRc9g
What should a client onboarding system solve?
A repeatable onboarding process has to answer three practical questions: what happens after a client says yes, who owns each action, and how does the delivery team know it is ready to begin?
Without a shared process, each new client can feel like starting from scratch. Tasks get scattered across someone’s memory, email and chat. The team may also lack a clear handover, leaving people unsure what to do in the first week. A useful system puts the work in one place and makes the next owner clear.
That does not mean every client follows an identical checklist. The core sequence can stay consistent while tasks and information change to fit the engagement.
Separate onboarding from delivery work
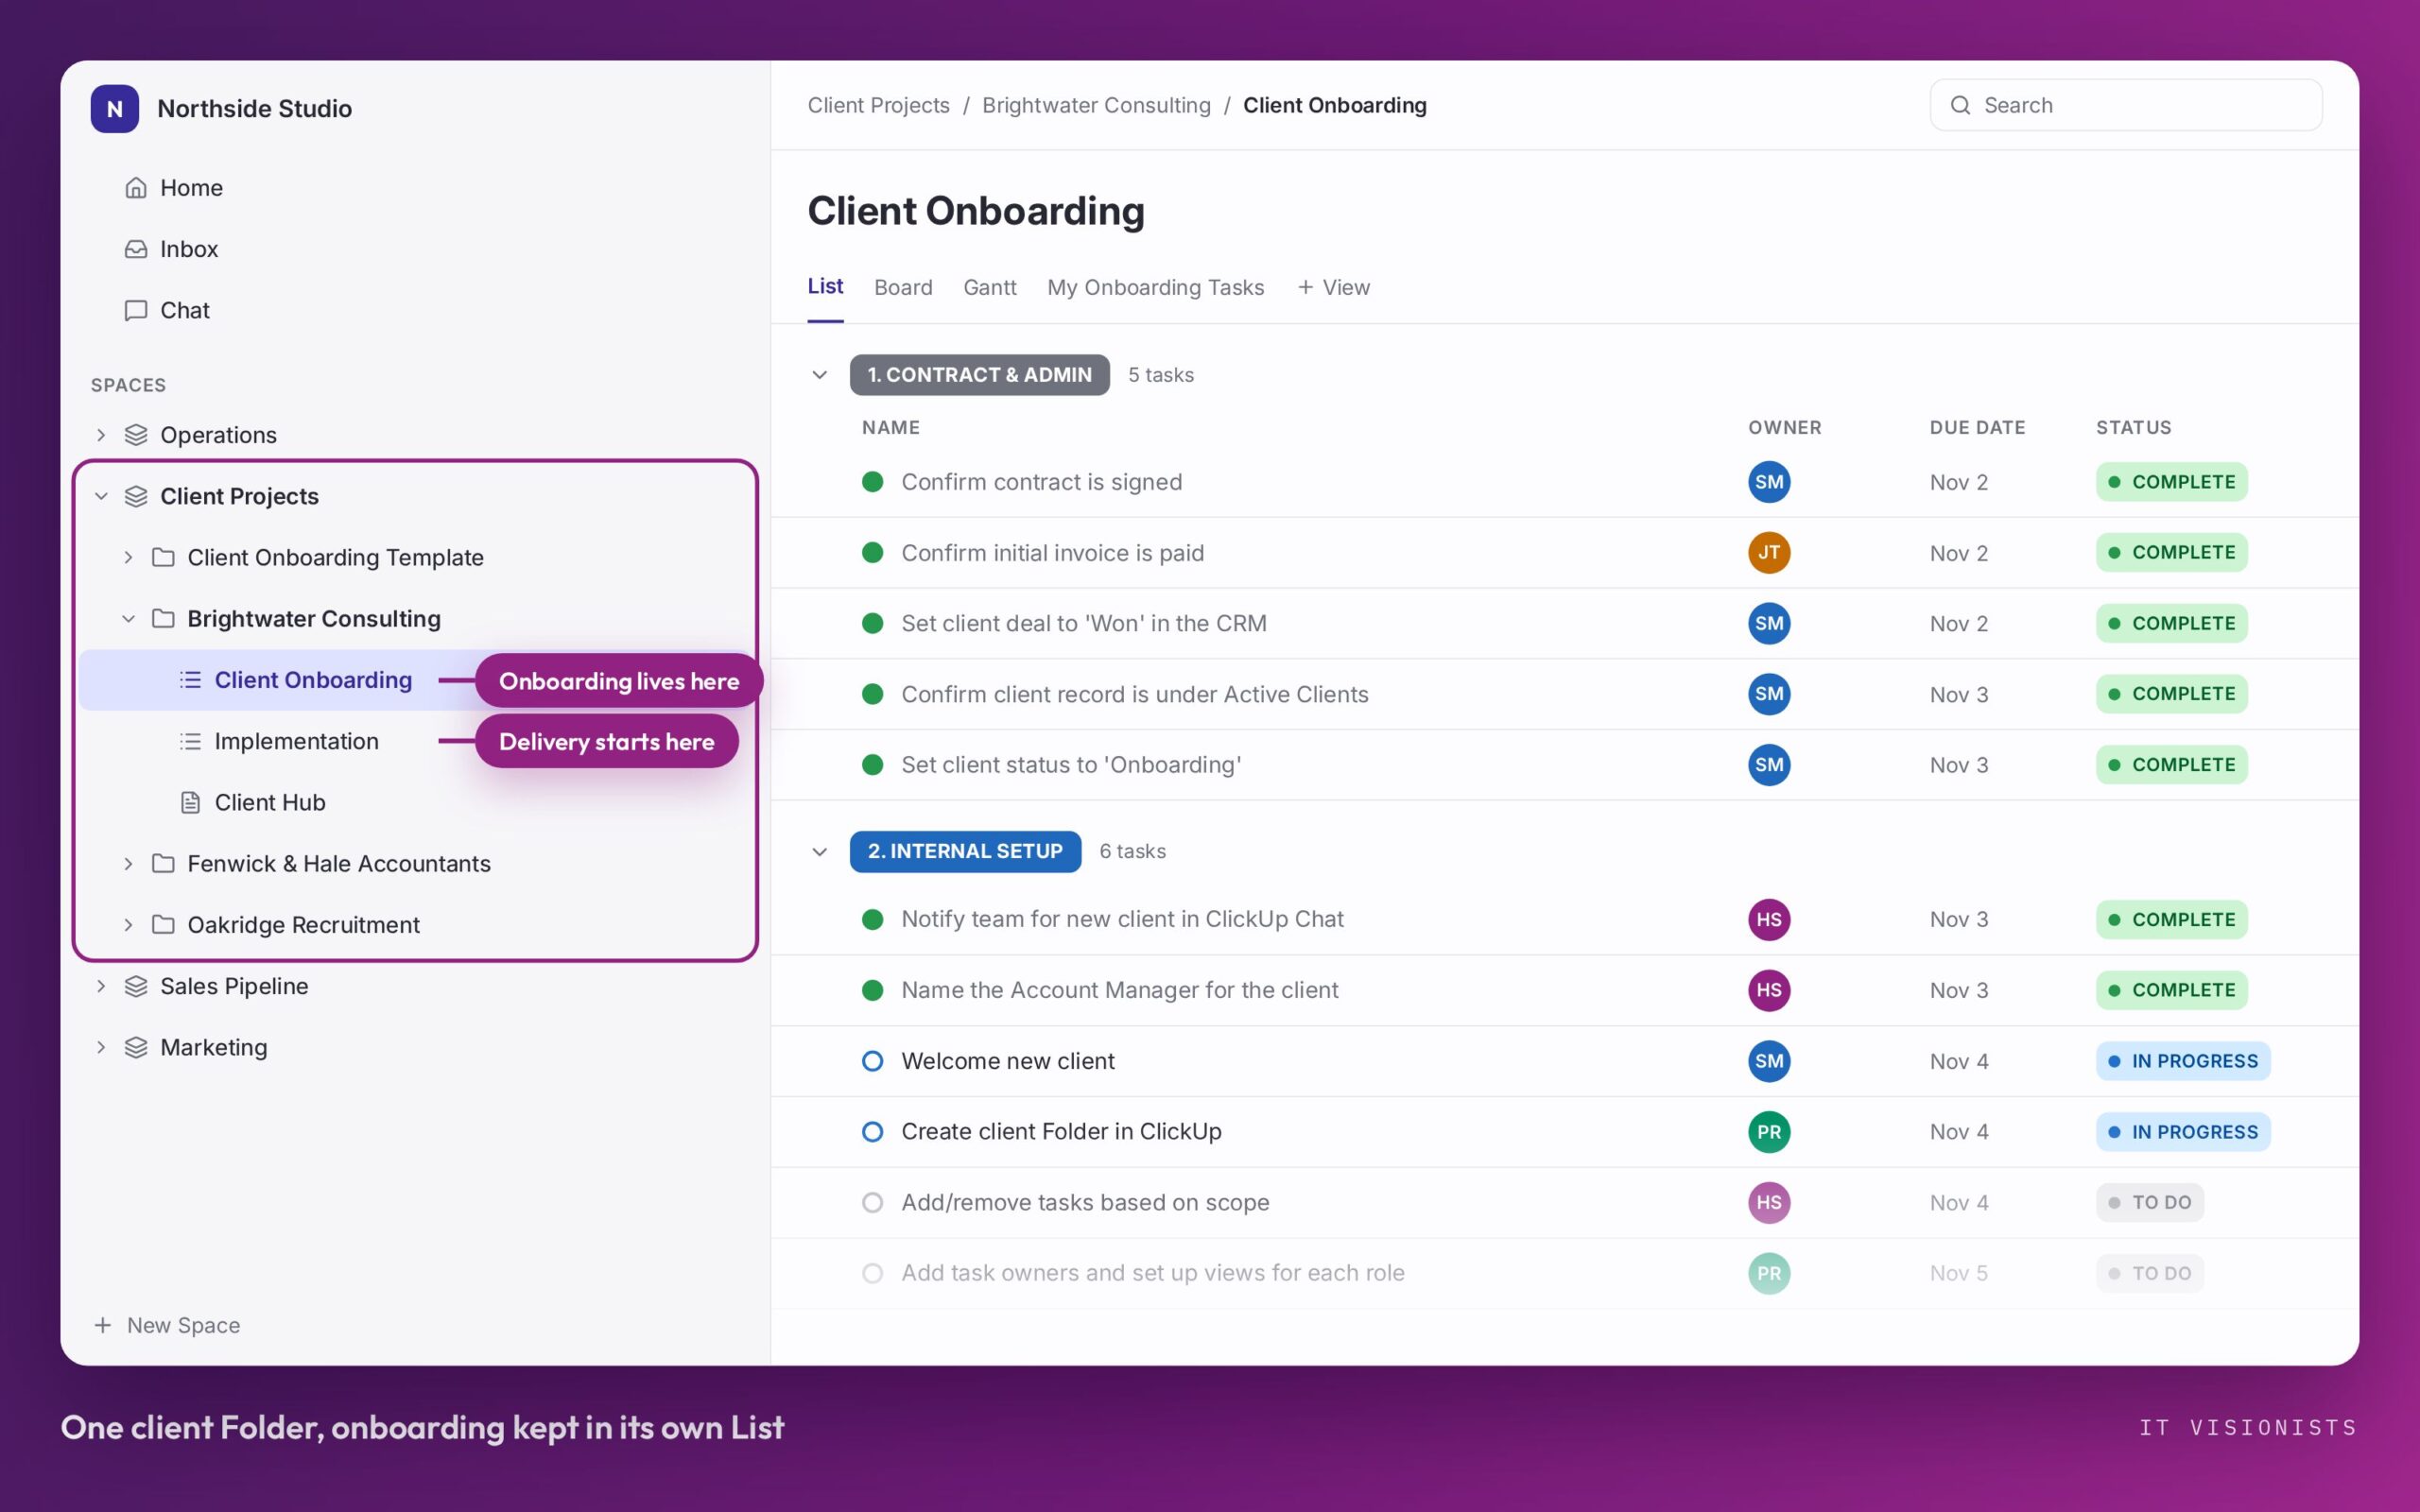
Keep onboarding distinct from active implementation. The structure described here uses a dedicated Client Projects Space. Each client gets a Folder, with a Client Onboarding List among the first Lists created inside it. Onboarding has its own workflow, status stages and timeline. When it is complete, the team begins work from the implementation List.
This separation makes the handover visible. The client-facing kickoff can finish without making onboarding tasks indistinguishable from delivery work. It also gives the team a place to adjust the onboarding steps for the scope of each engagement.
Organise onboarding into four phases
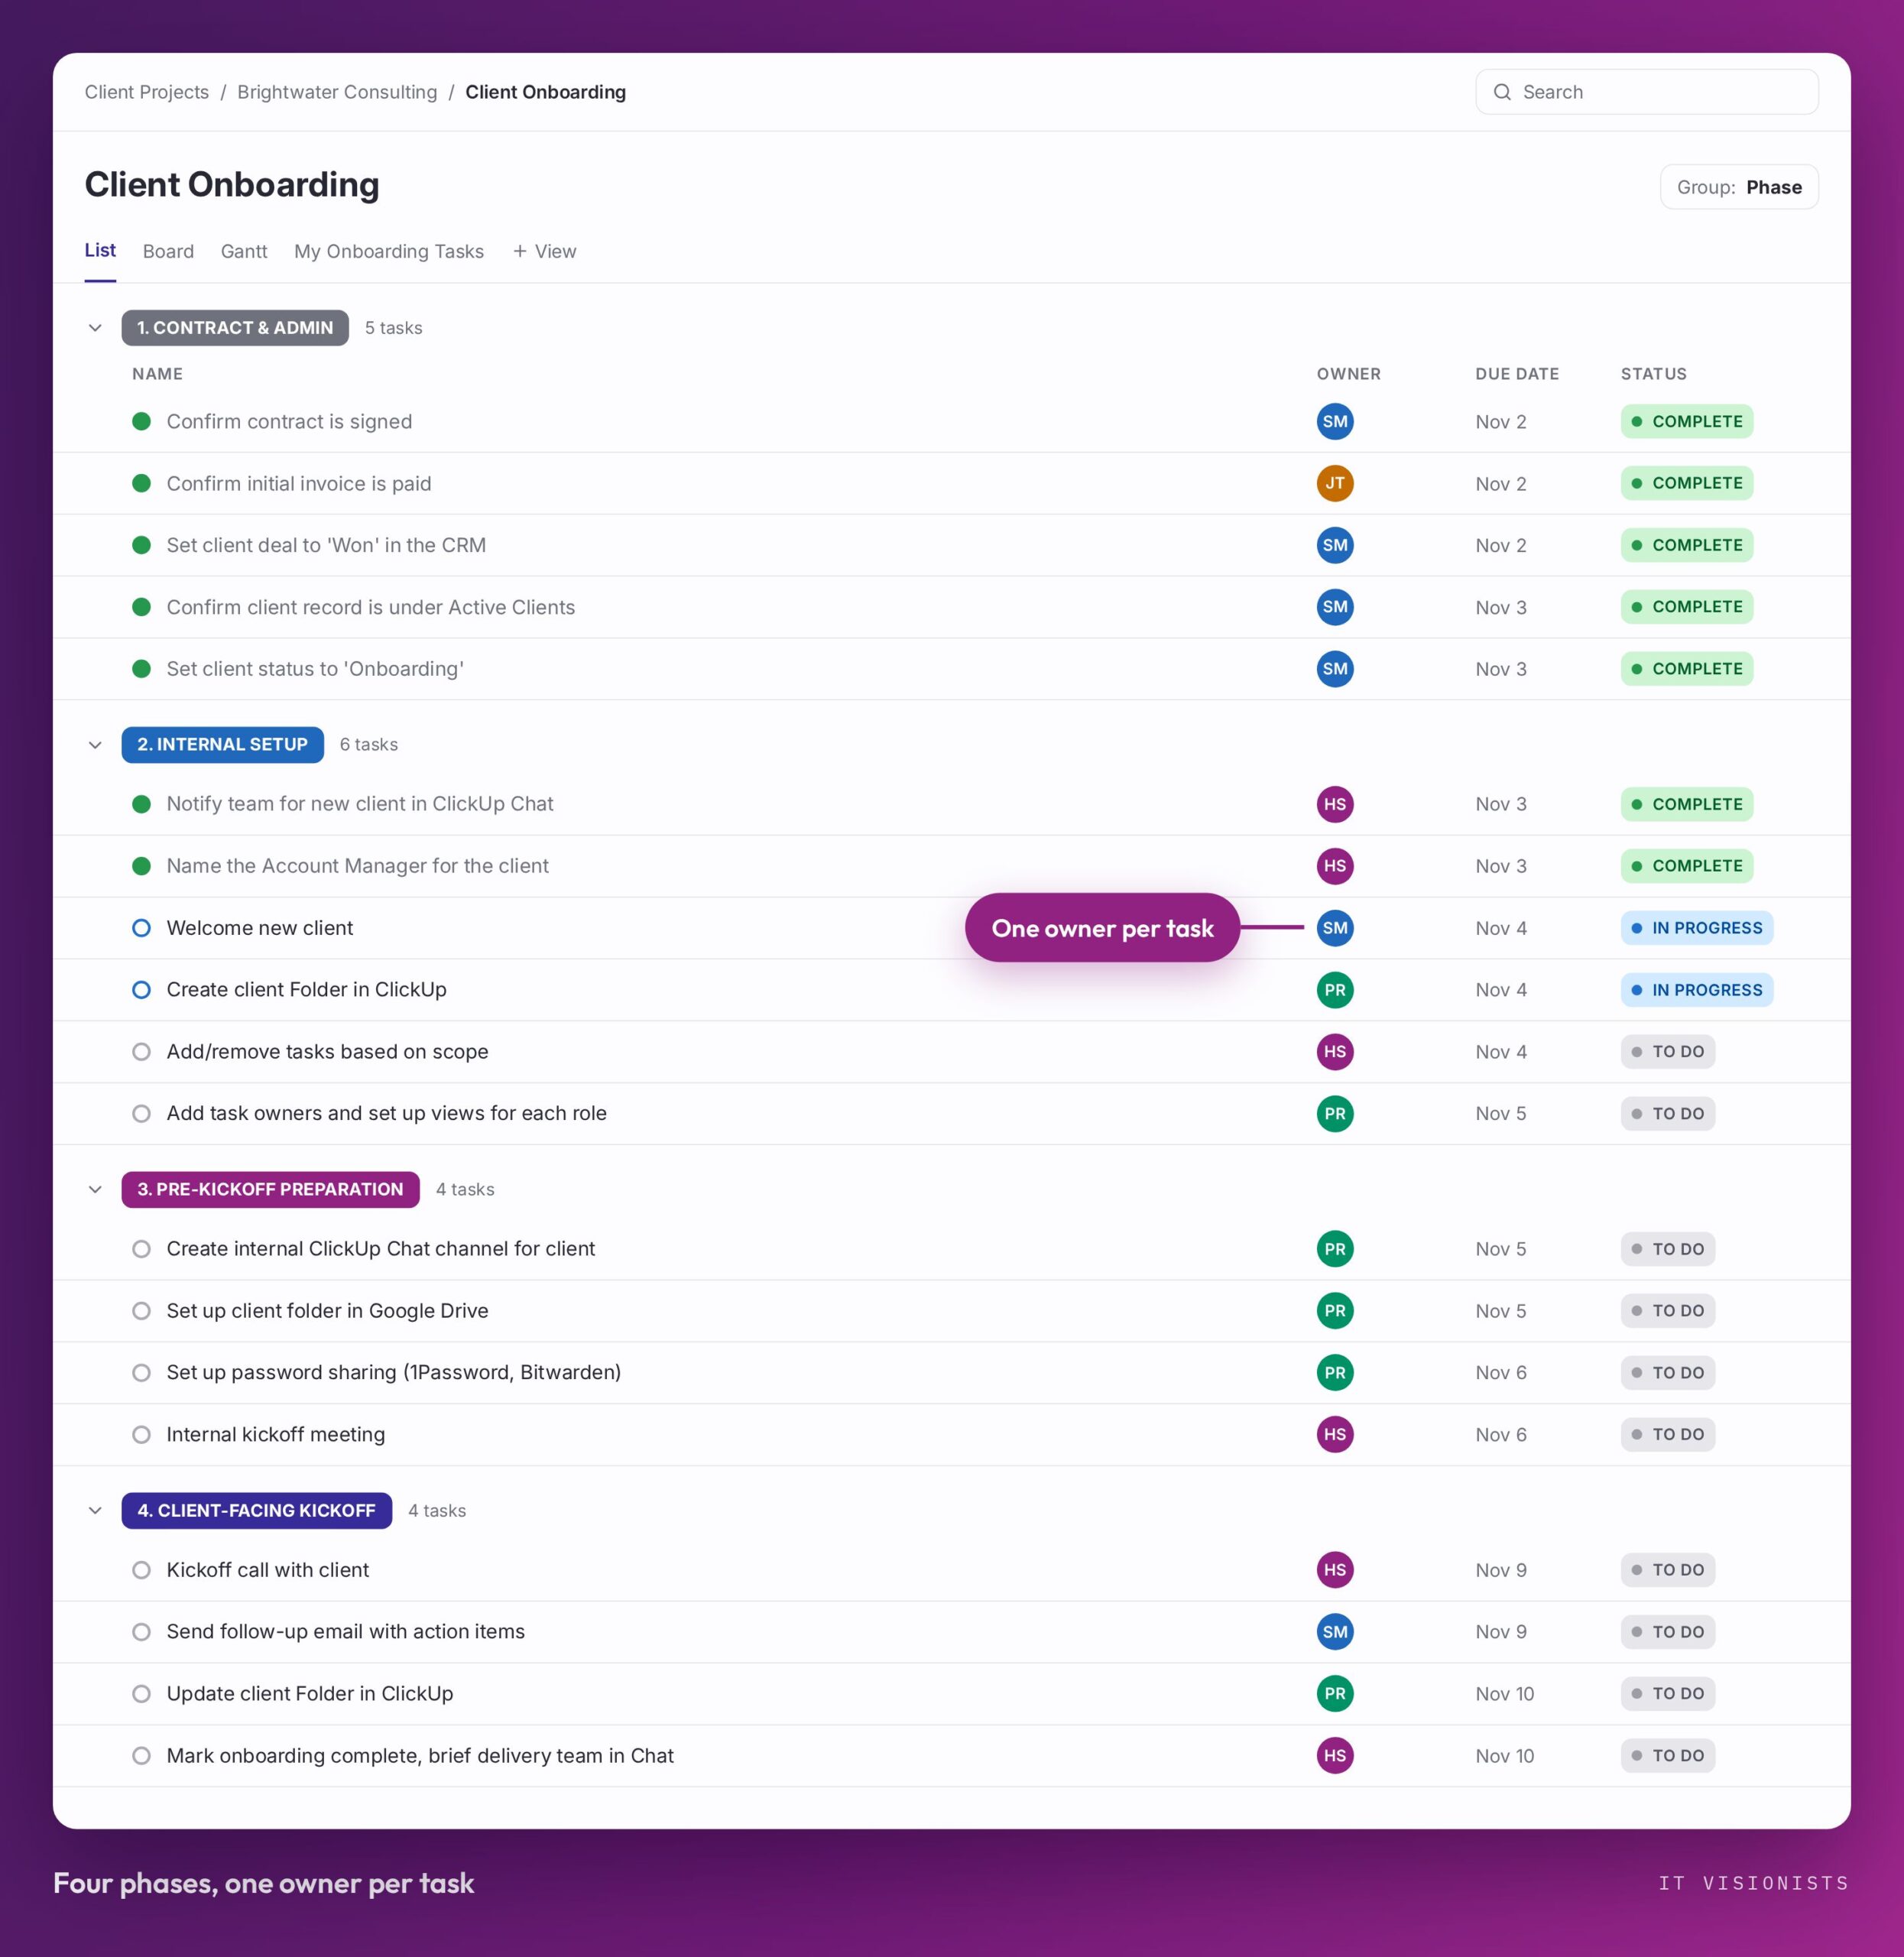
Use phases that match the actual sequence of work. The four below provide a starting point, not a rule that every business needs the same number.
1. Contract and admin
Start when the client agrees to proceed. Record the tasks that must be complete before the delivery team starts, such as:
- Confirm the contract is signed.
- Confirm the initial invoice is paid.
- Update the client deal to Won in the CRM.
- Check that the client record is under Active Clients and set its status to Onboarding.
These actions establish the commercial and administrative starting point. If they remain in separate inboxes or someone’s memory, the team can begin without a shared view of what has been confirmed.
2. Internal setup
Prepare the account before the client needs to navigate the process. Notify the team in ClickUp Chat, name the Account Manager, welcome the client, create the client’s Folder, add task owners and set up views for each role.
Then customise the task list for the engagement. Keep the reusable steps, but add or remove work where the client’s scope differs. This small review prevents a template from becoming a checklist that asks the team to complete irrelevant work or skips a real obligation.
3. Pre-kickoff preparation
Prepare the team and the tools it needs before the client kickoff. Create a dedicated internal ClickUp Chat channel for the client, set up Google Drive, hold an internal kickoff meeting and arrange password sharing through a password manager such as 1Password or Bitwarden.
The internal meeting is the point to align the delivery team before the client-facing call. Treat access and shared resources as part of setup, not as details to chase after work has begun.
4. Client-facing kickoff
Hold the kickoff call, send a follow-up email with action items and update the client Folder. Finish with a task to mark onboarding complete and brief the delivery team in ClickUp Chat.
That final task is the handover point. When it is marked complete, the automations take over. The delivery team should be able to tell from the completed onboarding work what has happened and what it owns next.
Build the process from an empty workspace
- Map the client journey. Write down each action from signed agreement to delivery handover. Name the phases before building the List. Note which steps belong to every client and which depend on scope.
- Create the workspace structure. Create a dedicated Client Projects Space, then a template Folder for the onboarding setup. Add a Client Onboarding List and plan a separate implementation List for delivery work.
- Add phases, tasks and owners. Put the onboarding tasks into the four phases or the equivalent stages that fit the process. In this setup, give each task one owner. Add due dates and role-specific views where they help the people doing the work.
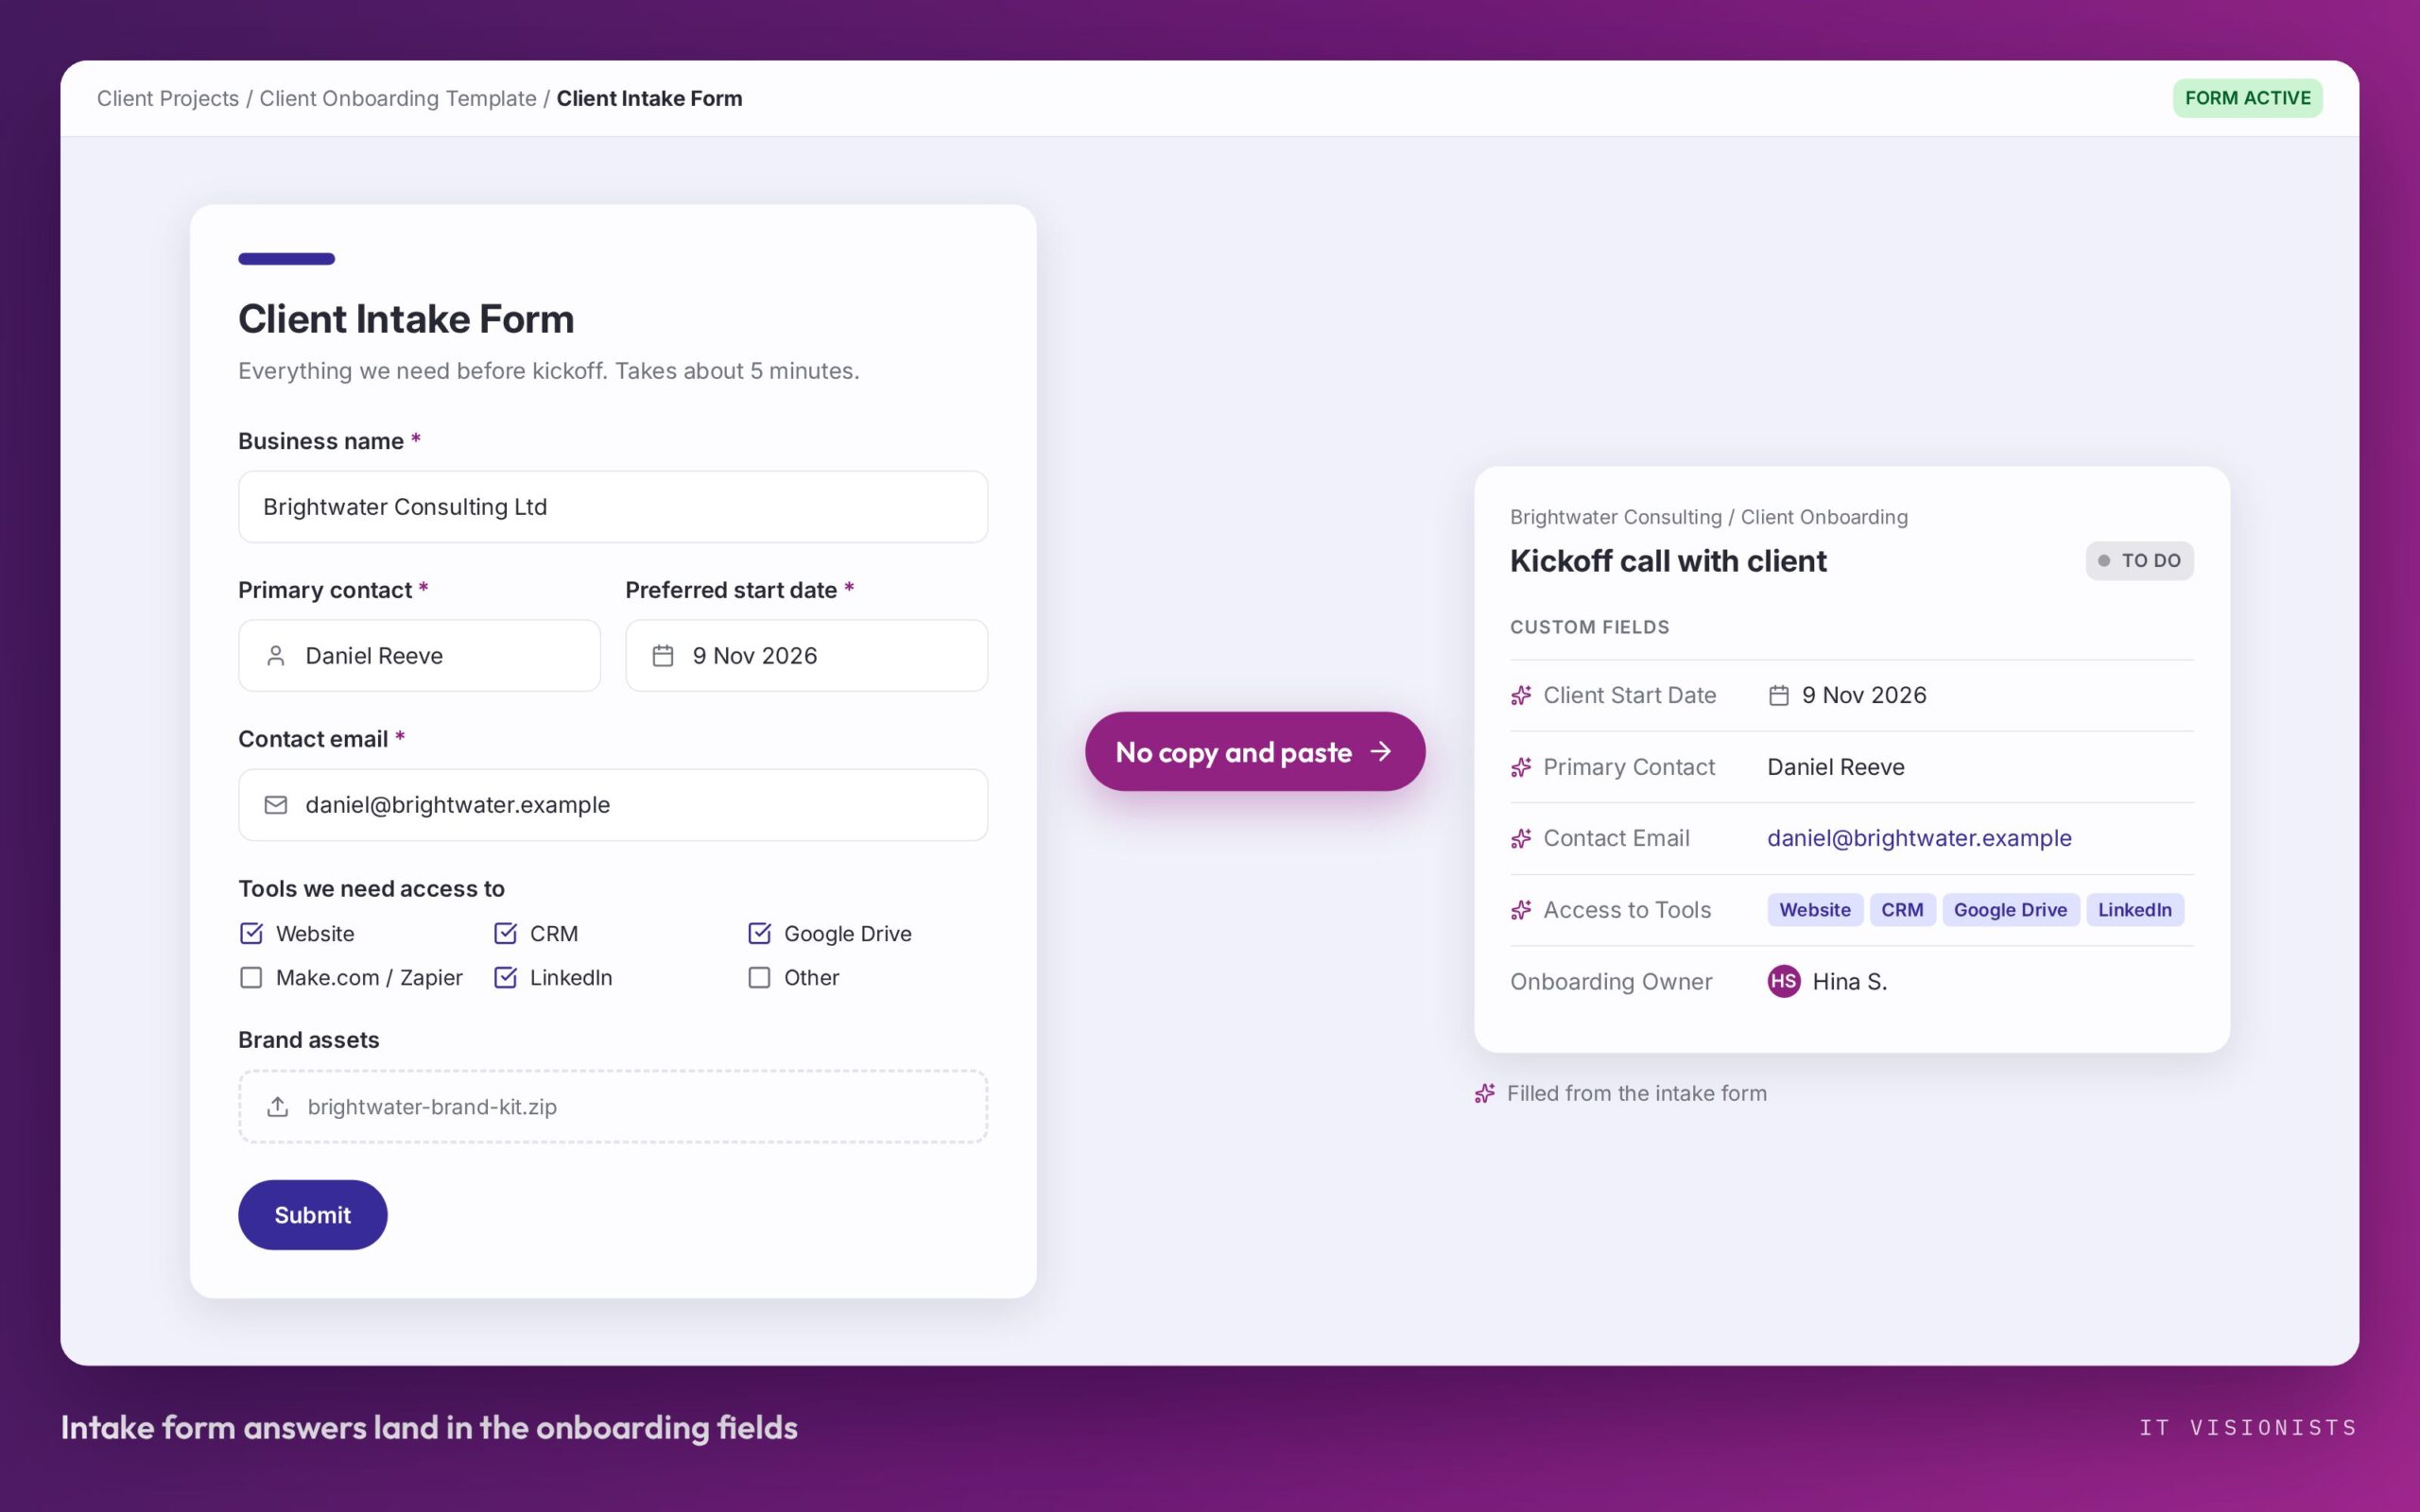
- Decide what client information is needed. Identify the details the team needs before it can start. The example setup includes Client Start Date, Primary Contact and Onboarding Owner. Keep the fields tied to information the team actually uses.
- Set up intake. Build a ClickUp form around the information you need from every client, such as key contacts, access details and brand assets. The described setup has form responses populate relevant custom fields in the onboarding Folder, avoiding a separate copy-and-paste step.
- Make a reusable template. Once the Folder, List, tasks, owners, due dates, fields, statuses and automations are in place, save the setup as the client onboarding template. For a new client, duplicate it, rename the Folder and fill in the client-specific fields.
The example setup is designed to make repeat client creation quick. The first build still takes planning and configuration. Do not treat a template as finished just because it copies: review the scope-specific tasks and owners for each engagement.
Automate repeated work, then review the handover
Automations should reduce repeated manual steps, not decide what a client needs. The working rule here is to perform a manual step at least three times before deciding to automate it. That gives the team a chance to see whether the step is genuinely repeated or whether it changes from client to client.
Start with recurring actions such as assigning work, notifying the team or chasing due dates. Connect those rules to the point in the process where they are needed, and use the completed onboarding task as the signal that delivery can take over. Keep the details of each rule explicit: what event starts it, and what action should follow.
As of October 2026, the source for this setup names the automation outcomes, including assignment, notifications and due-date follow-up, but does not specify the exact trigger and action for each rule. Do not copy an assumed recipe. Write down the rule your team actually needs, then verify it against a test client Folder and task before relying on it for a live client.
Adapt the system to your team
Before you reuse the template, answer four questions:
- How many phases does onboarding really have? A solo consultant may need fewer stages than a larger team.
- How many people deliver the work? Decide who owns each task and where responsibility changes.
- What information must arrive before work starts? Use that answer to choose the fields and intake questions.
- How does that information reach the team now? If someone copies it from email or another form, consider whether a ClickUp form can bring it into the onboarding setup instead.
The right structure is the one that matches the actual handoffs. A template that ignores a team’s roles or client-specific scope will create workarounds instead of preventing them.
Where this approach has limits
A four-phase structure is a starting point, not a universal standard. Some businesses may need fewer or more phases, and the task list will vary with each engagement. The script also does not provide exact automation recipes or due-date calculations, so those need to be defined and checked in the workspace rather than guessed.
The process depends on people completing the final handover task and keeping the client-specific setup current. Automation can support that process, but it cannot replace a clear decision about who owns the next step.
If your onboarding process is difficult to map because work is spread across too many places, start with the free Business Chaos Check.